Oracle Database 12c – install on Virtual Box with Oracle Linux 6.5 (64 bit)
This article is a father of all others you can find on this page. I’m going to start with this basic tutorial for those, who are not ready to start their own virtual machine from scratch or feel unsure, how to do it. From the other side, advanced users can refer to this tutorial as a starting point in other articles. This way there is a chance to get almost the same environment if you would like to test commands for yourself.
Introduction
Starting point for this article is presented in a table below.
| Attribute | Value |
|---|---|
| Install media |
Virtual Box 4.3 – Virtualization software (VirtualBox-4.3.10-93012-Win.exe with Oracle_VM_VirtualBox_Extension_Pack-4.3.10-93012.vbox-extpack) You can use latest version you can find on Oracle site Oracle Linux 6.5 (64 bit for x86) Oracle Database 12.1.0.2.0 (64 bit for Linux 6.5) |
| Virtual Box Settings |
General: Linux / Oracle (64 bit) System: Base Memory 10GB, Chipset ICH9, Enable I/O Apic, Hardware Clock in UTC Time, 2 CPU 100%, Acceleration VT-x/AMD-V + Nested Paging Display: Video Memory 32MB Storage: Controller SATA with 5 disks, each datafile allocated dynamically
Network: Host-only Adapter Intel PRO/1000 and Cable Connected |
Operating system installation
Follow those steps to install Oracle Linux 6.5 in Minimal configuration.
Booting from DVD and starting configuration
On each screen you can see options which I usually choose for fresh install.
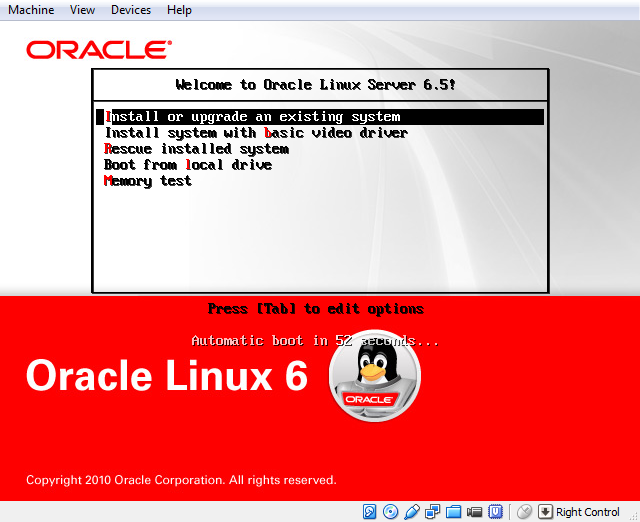
Boot screen, take first option.
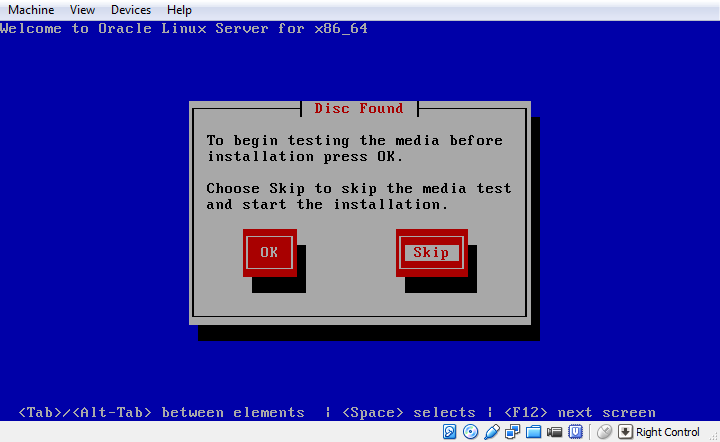
Skip media test.
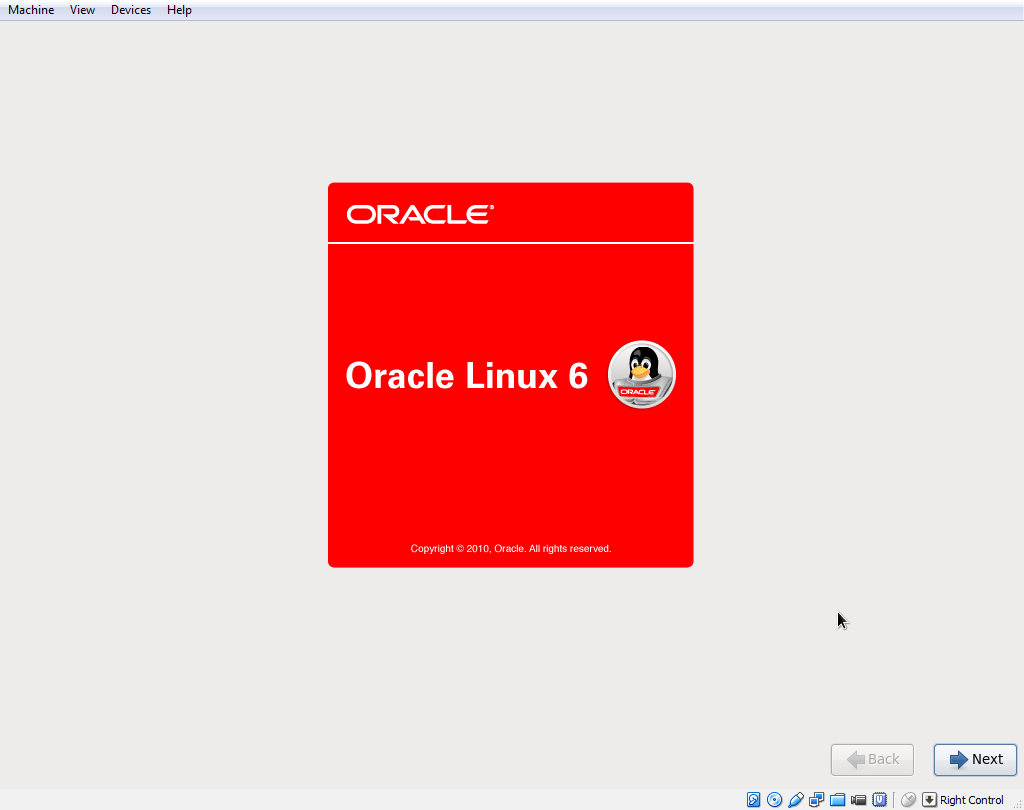
Starting screen.
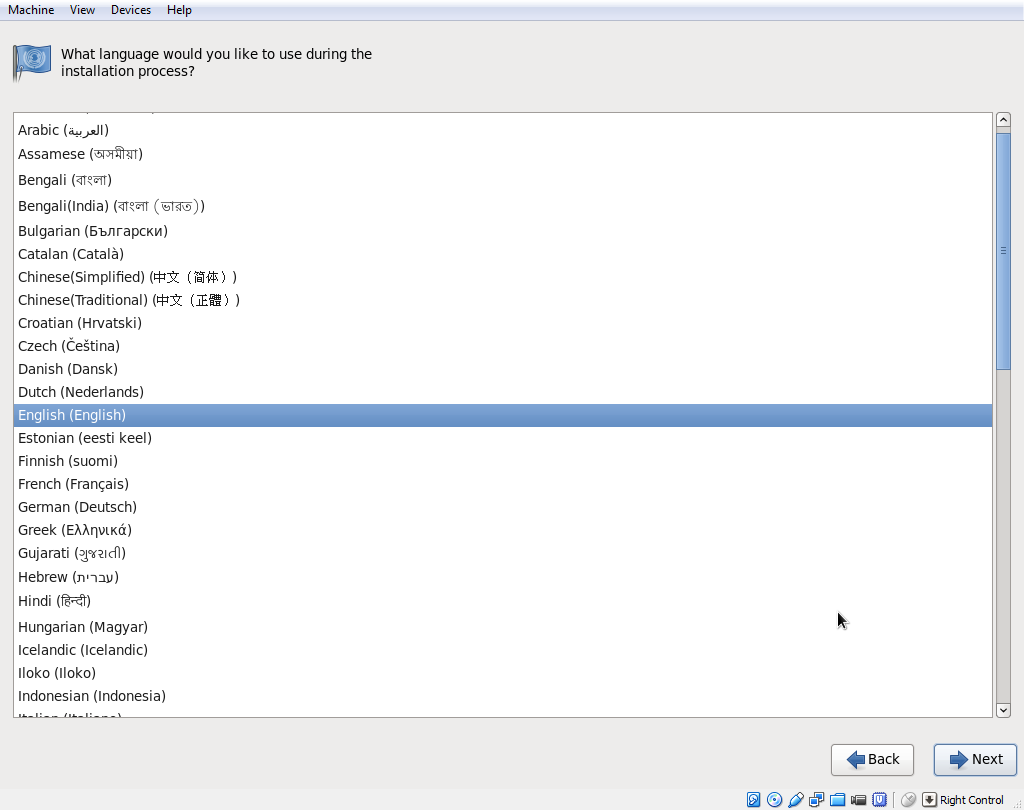
Choose your language.
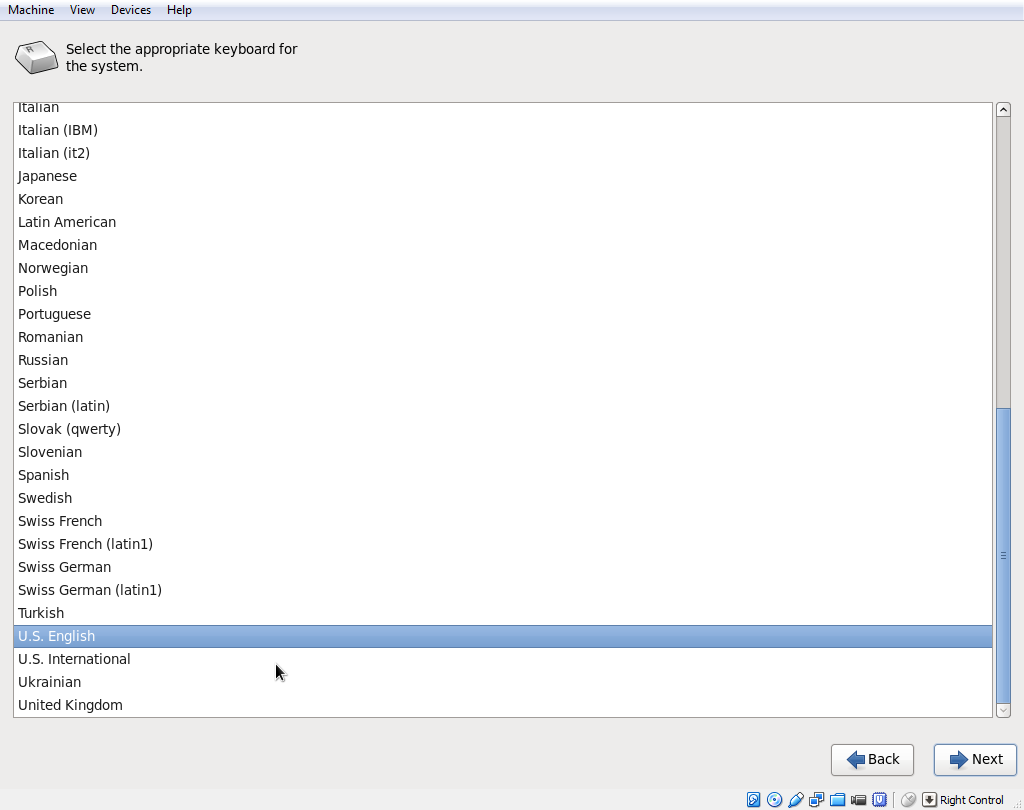
Choose keyboard set.
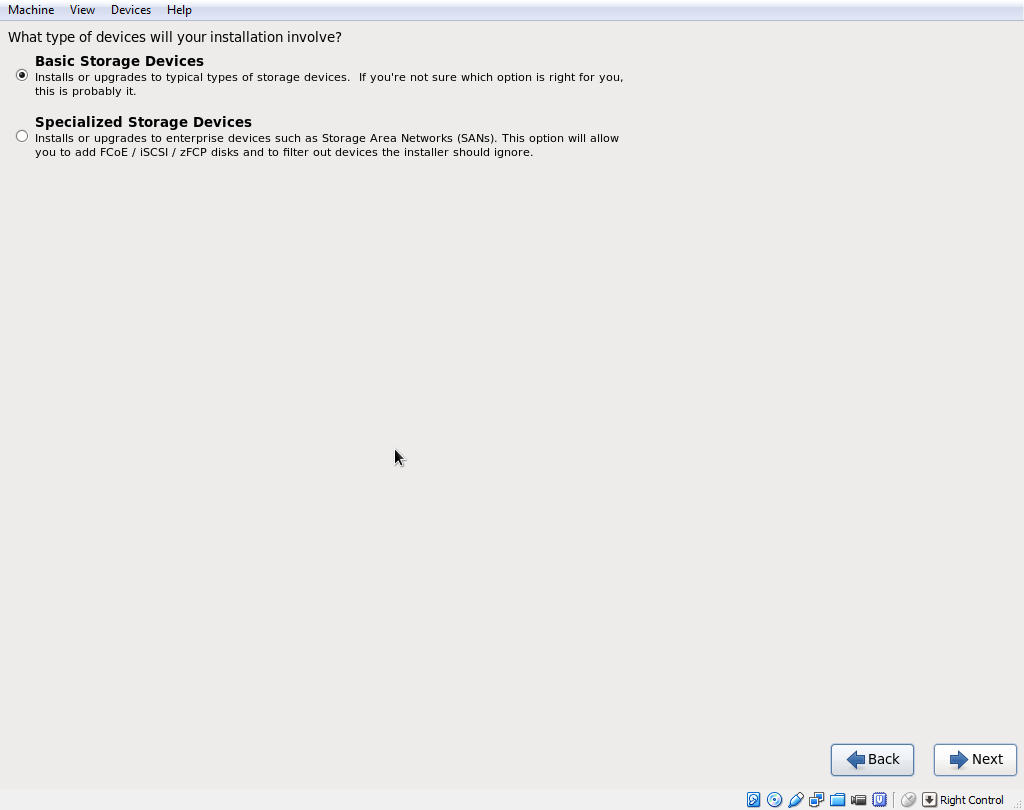
Take first option. If you need to use second option it’s not too late to find other tutorial.

It’s fresh installation – we discard any data that reside on disks (I assume, that disks are empty anyway).
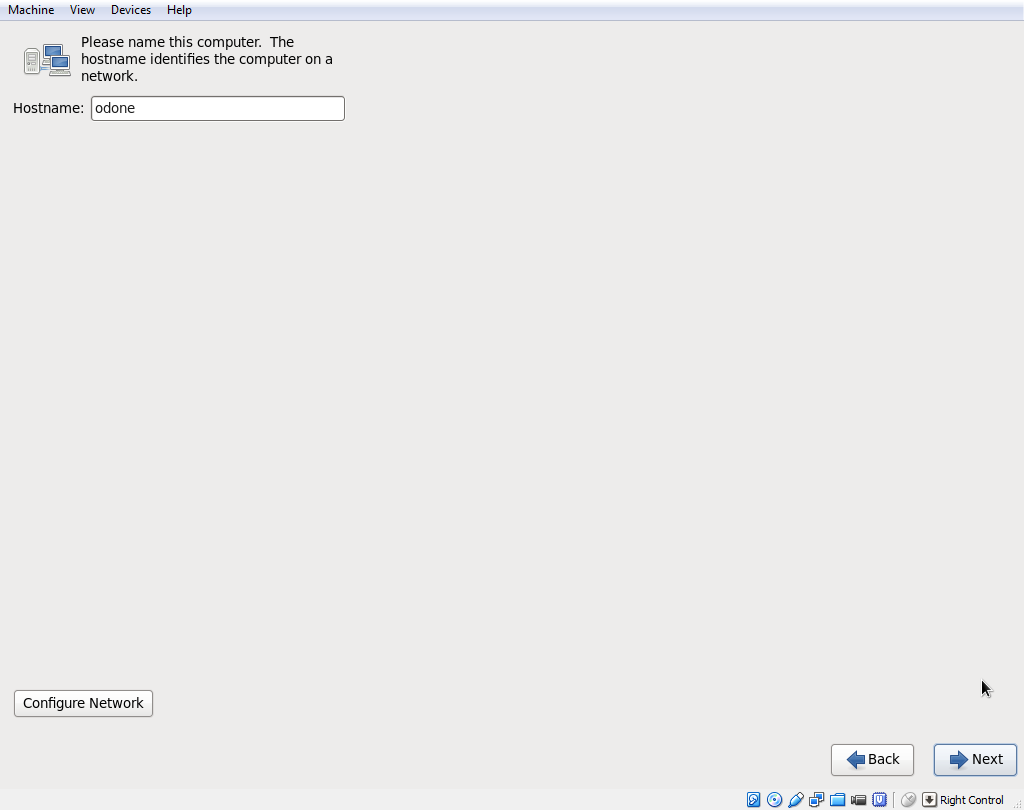
Choose your host name – for me it’s odone from Oracle Database ONE – with time you use acronyms for everything just like Oracle does. Leave network configuration as it is.
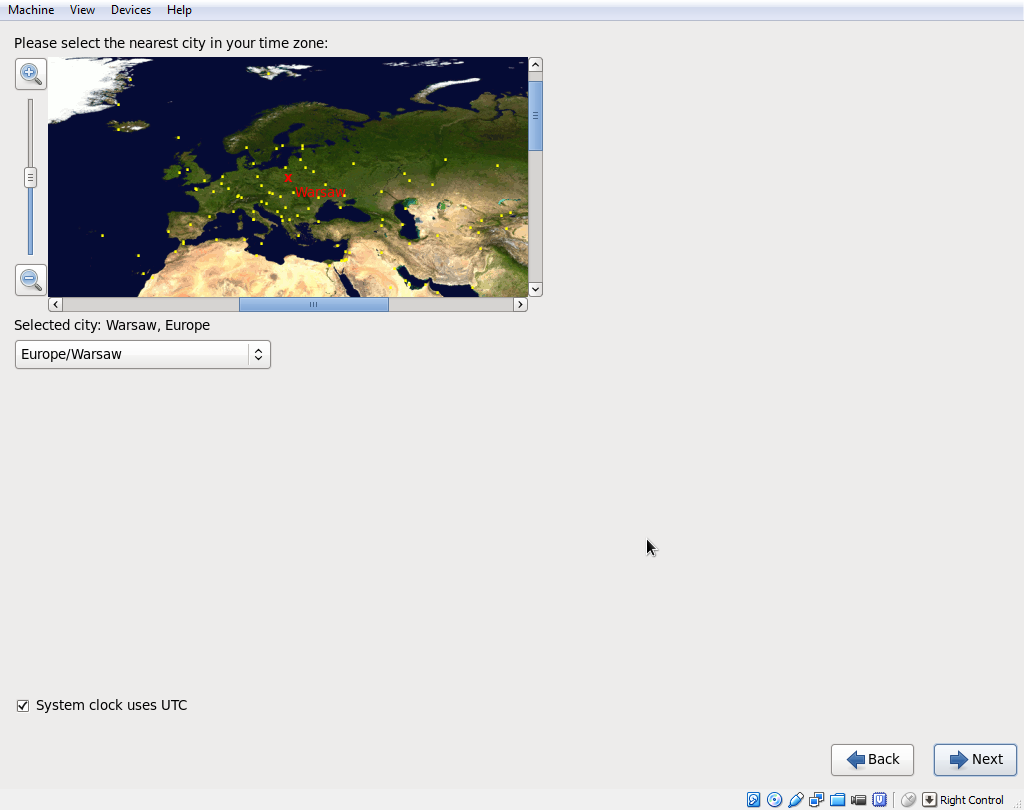
Choose your time zone.
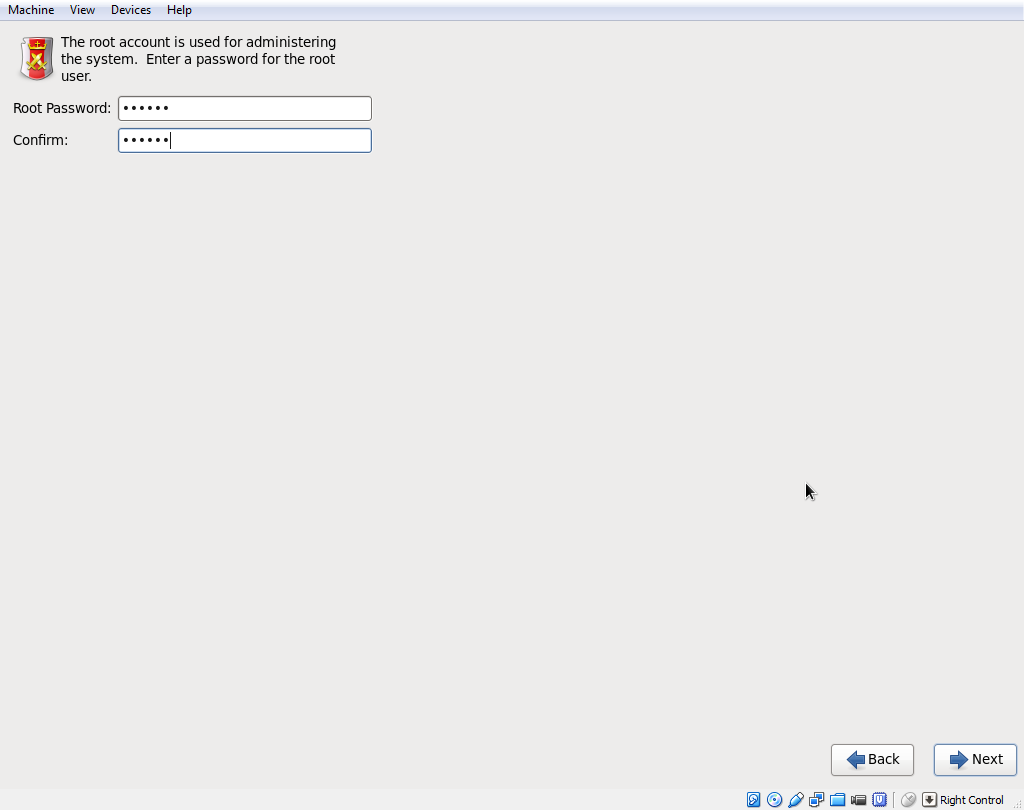
Input root password. Don’t forget to memorize it or just put in a plain text file close to your Virtual Machine directory. This way you won’t loose it by accident.
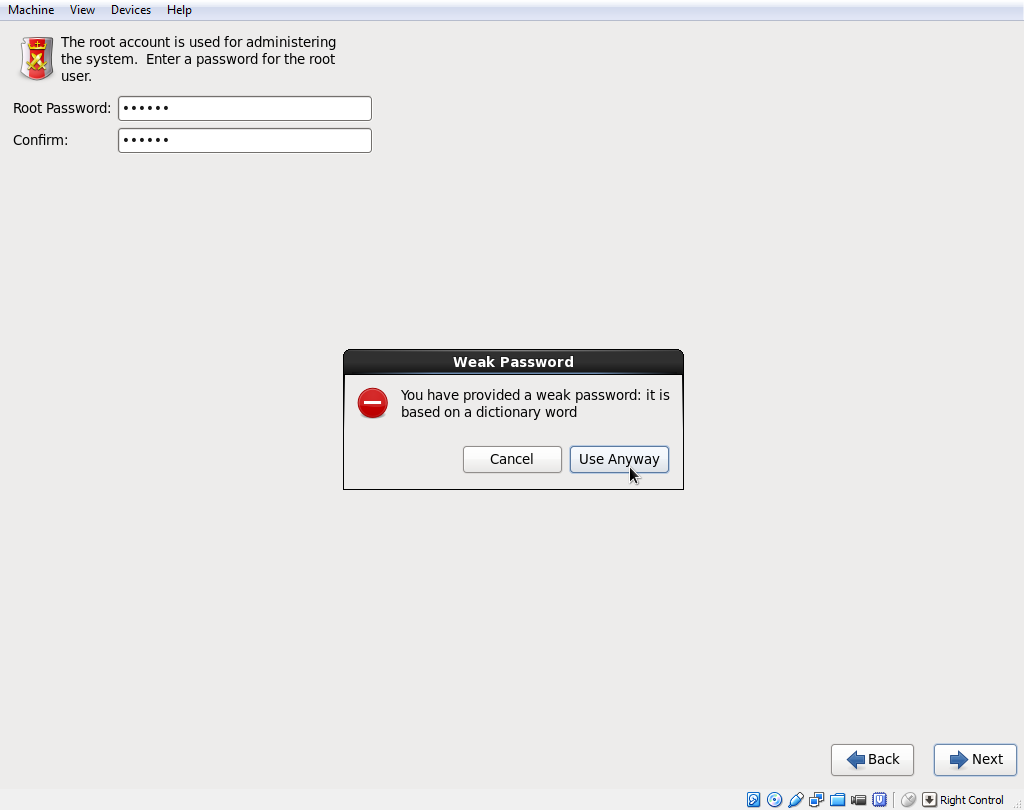
As usually for all my Virtual Machines – password is not so complicated – this way I can use it across all my test Virtual Machines.
Storage setup
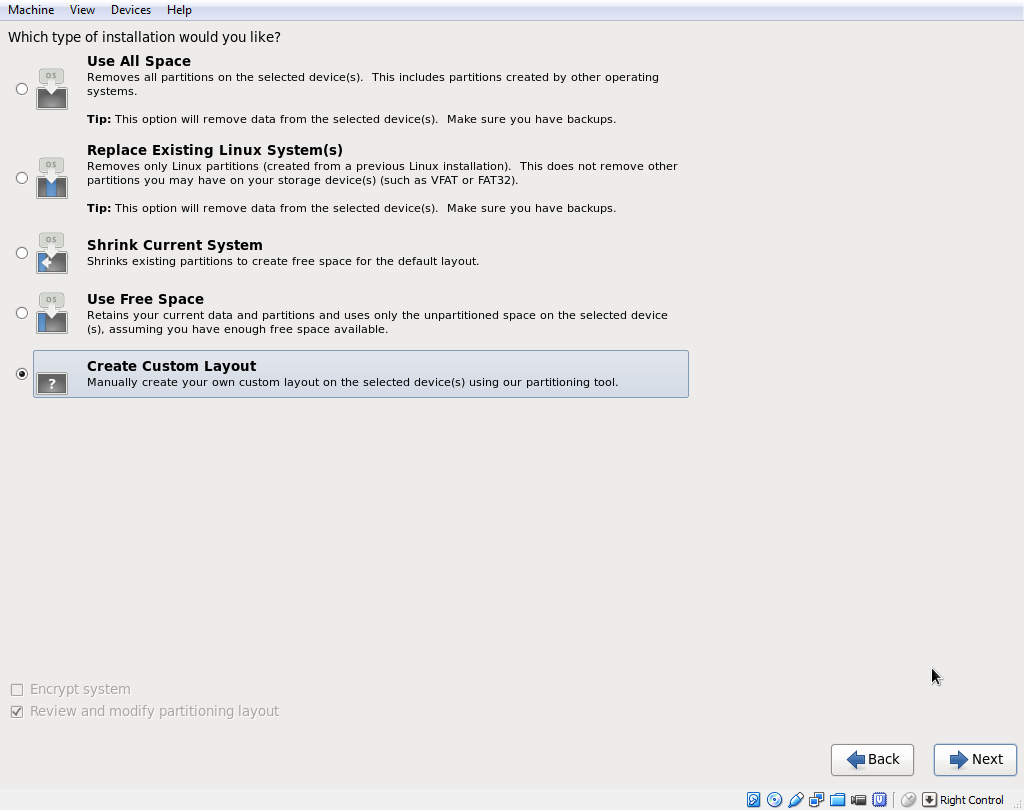
Choose Custom Layout – we’ll create really basic configuration for disks.
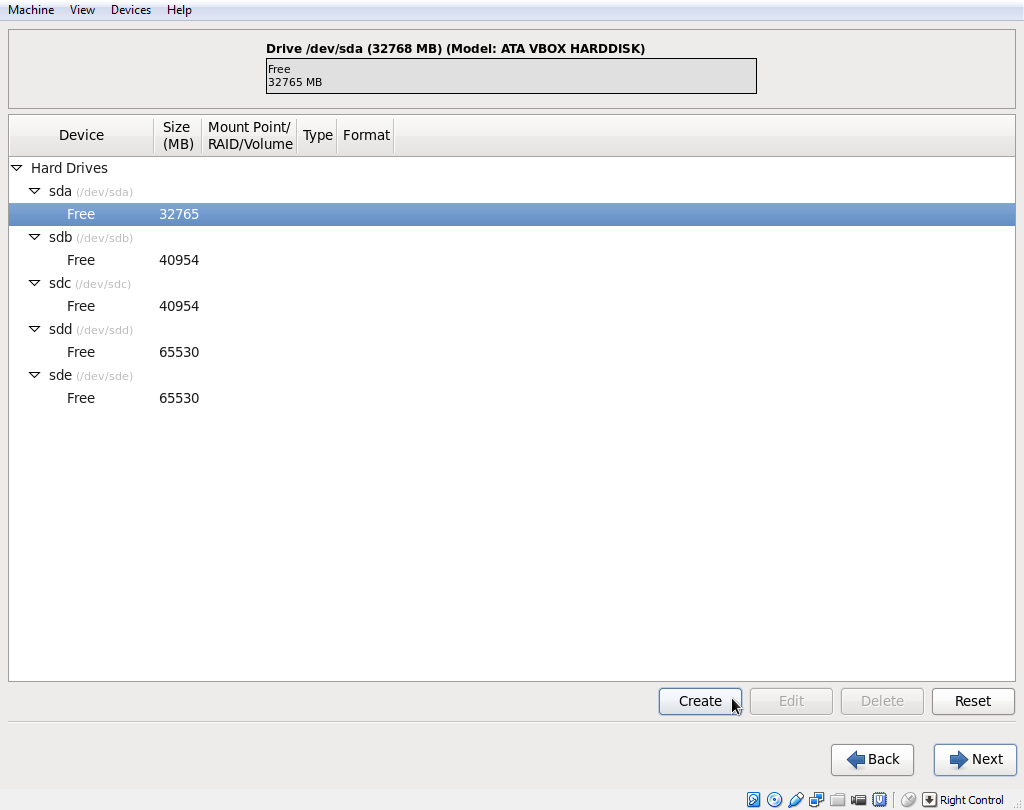
We’ve got 5 disks available. In this wizard we’ll create root disk only for operating system.
Choose standard partition.
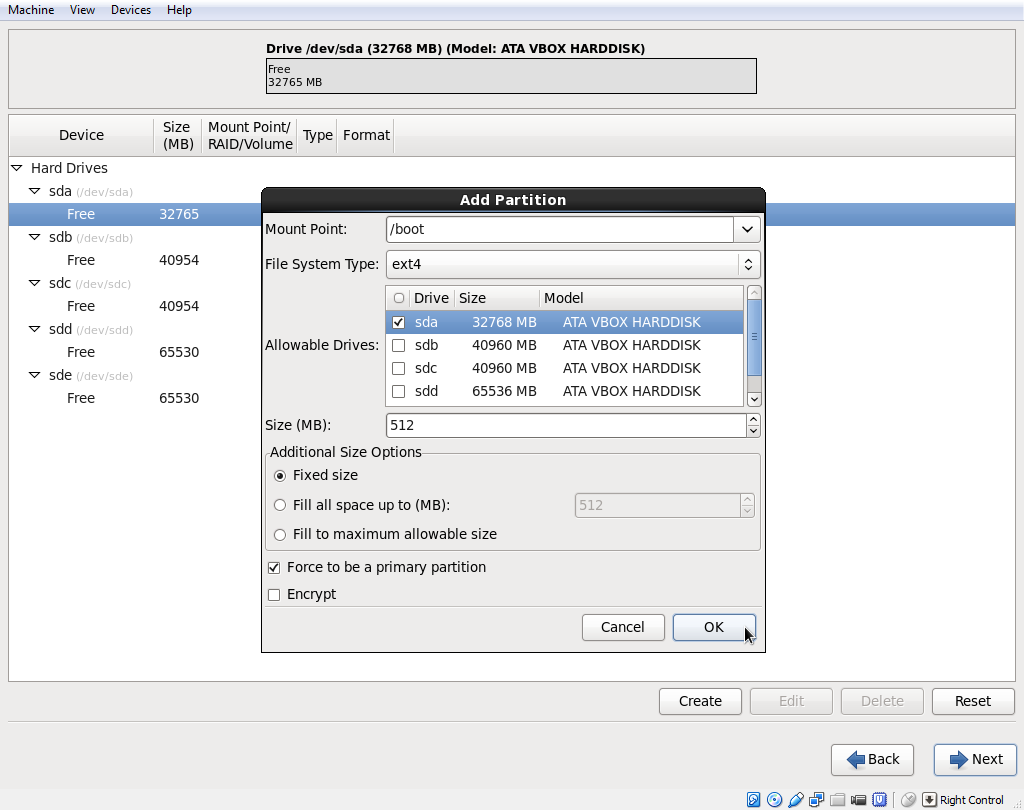
Choose mount point /boot, ext4 filesystem and check sda disk. Size of 512 MB should be sufficient even for upgrades. Force to be a primary partition.
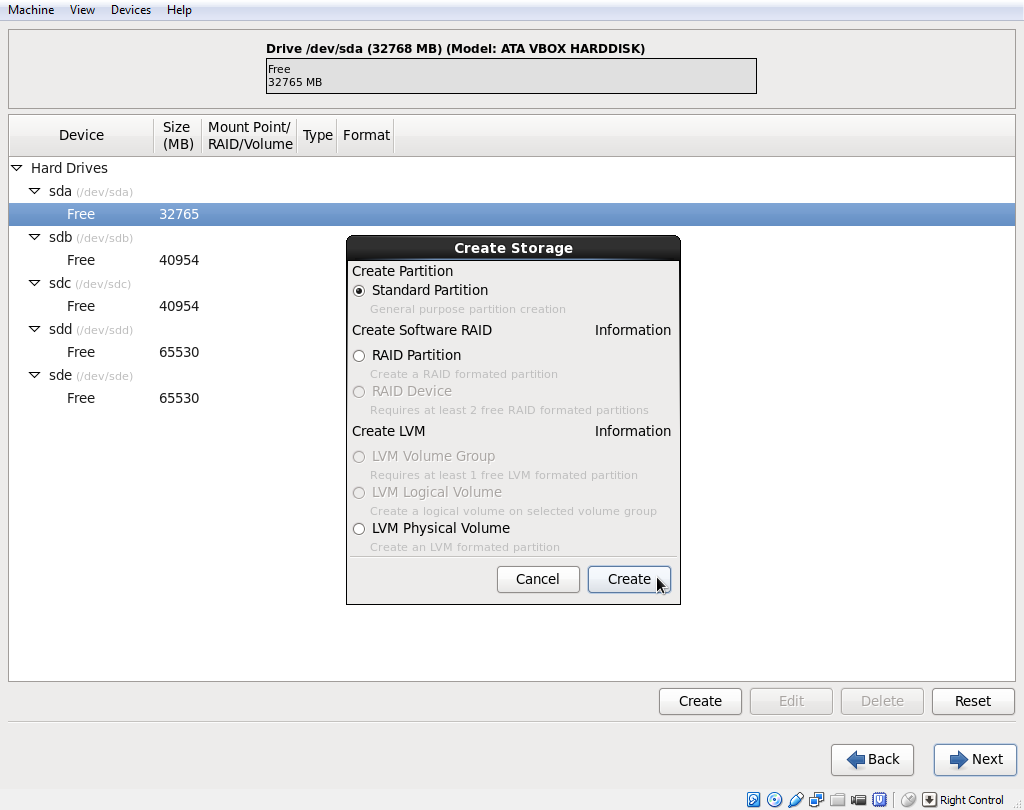
Create another partition – select Free space on sda disk and hit Create button.
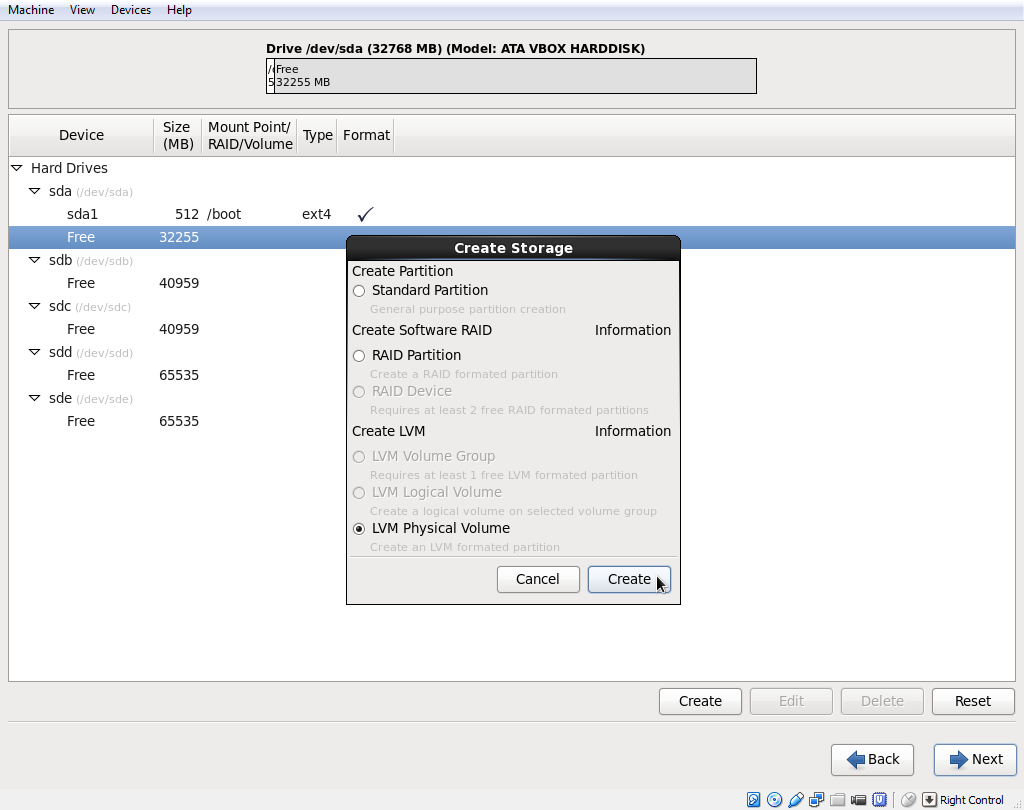
You’ll see Create Storage window again. Choose LVM Physical Volume.
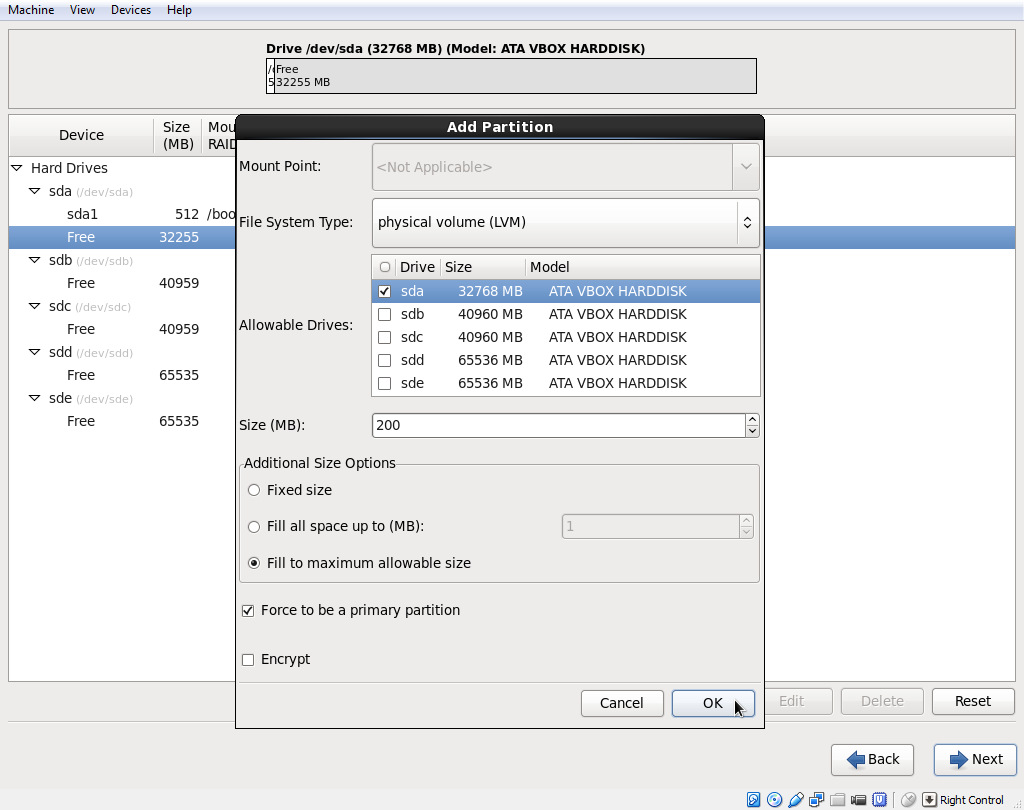
To use LVM you need to create physical device first and than slice it with logical volumes. Choose Fill to maximum allowable size to use all free space on sda that left after creating /boot partition. Force to be a primary partition.
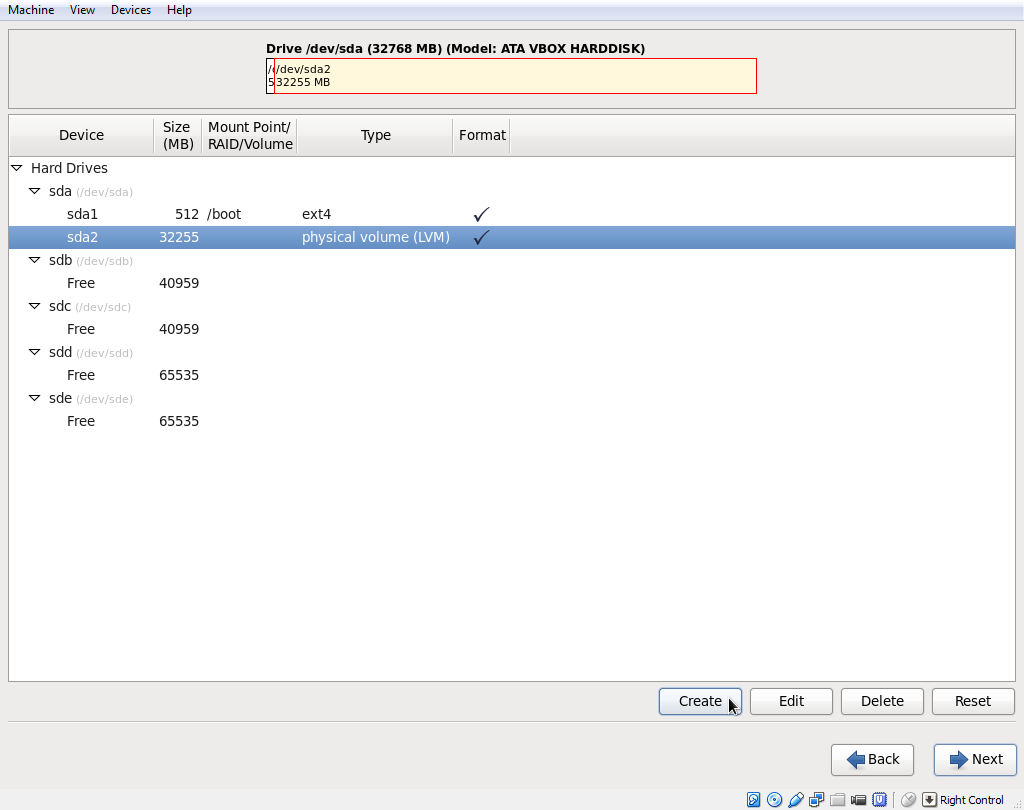
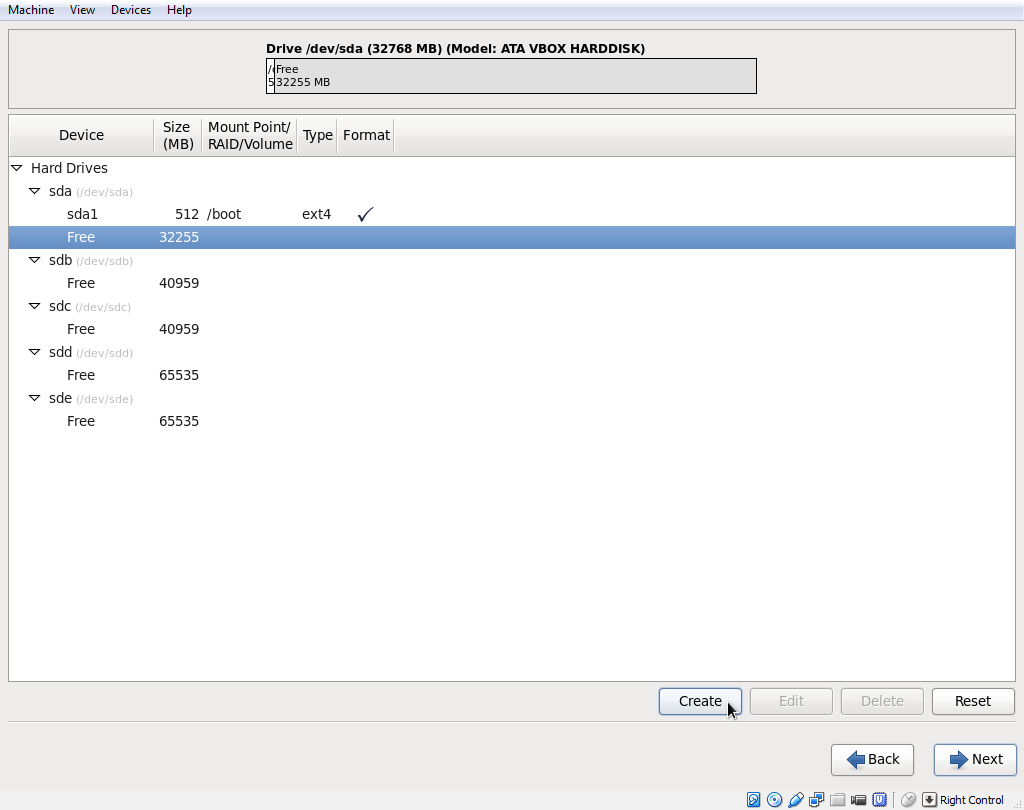
sda disk is now sliced into two partitions – /boot and physical volume for LVM. Select sda2 partitiona and hit Create button again.
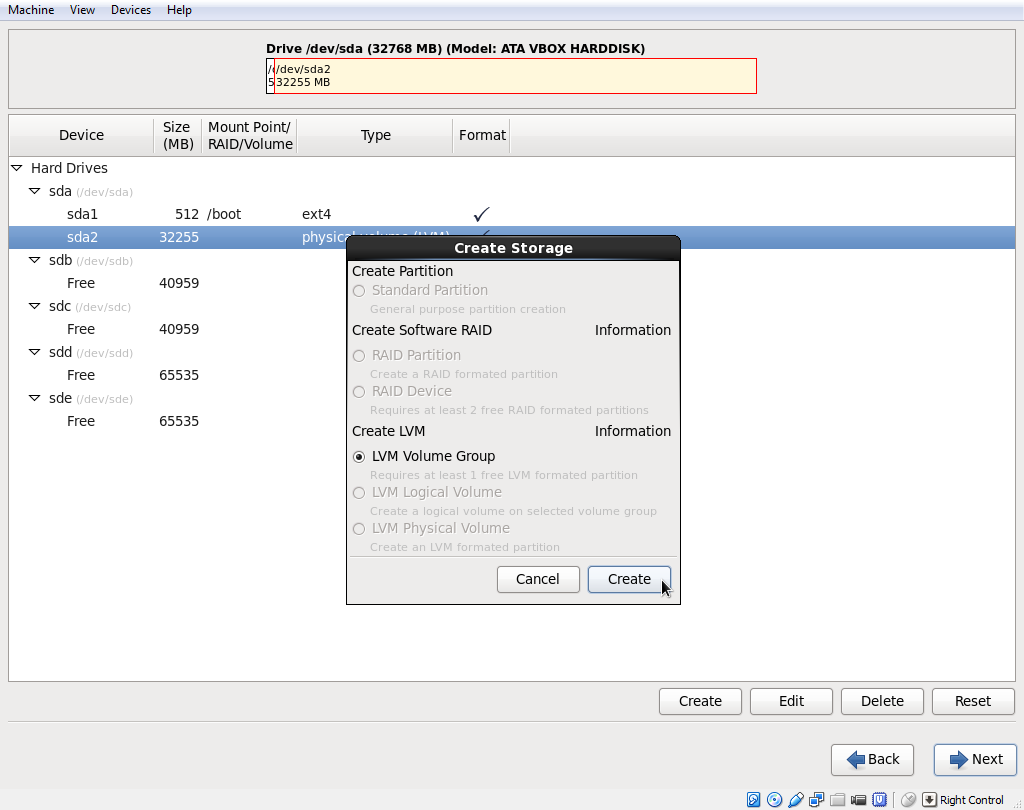
You can see that radio button for LVM Volume Group is enabled (end the only one available in this situation). Hit create button.

Now we have new window specially for LVM management. Change Volume Group Name to vg_root and leave default value of 4 MB for Physical Extend size – this option is responsible for your logical volumes allocation. Smaller chunks are right for smaller volume groups, bigger chunks for big files and bigger partitions on LVM. Hit add button to add logical volume on vg_root volume group.
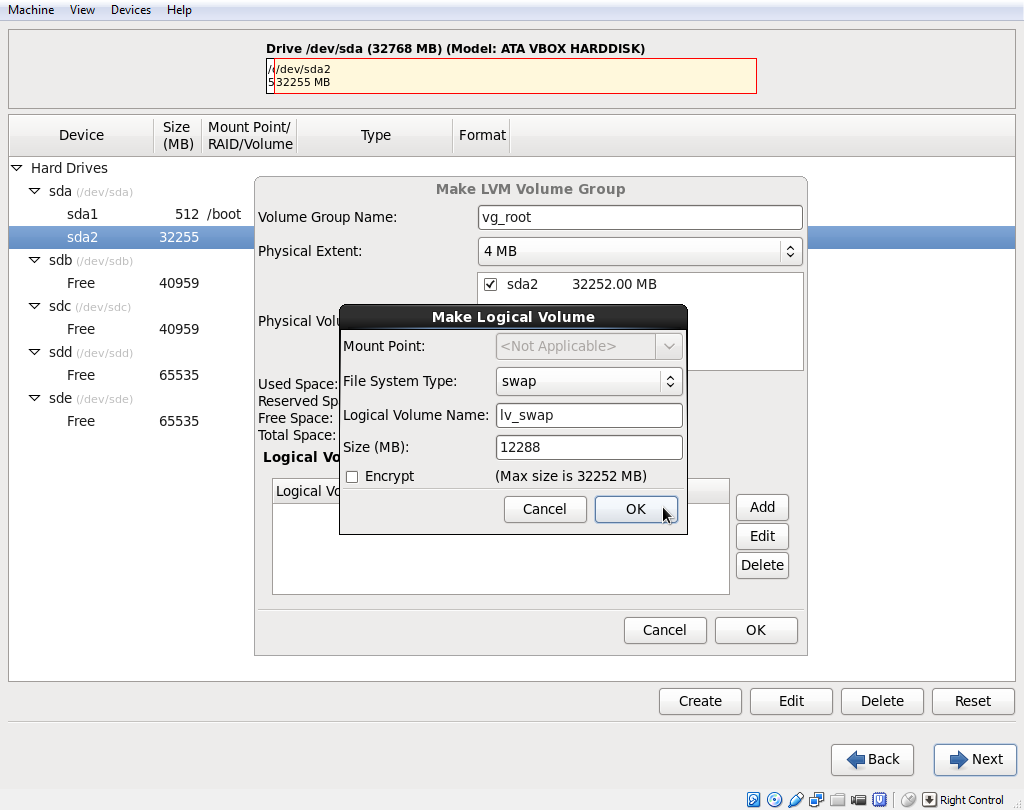
Create swap partition (your page space/virtual memory area on your hard drive). Name it lv_swap and use swap file system. Size depends on your RAM size which you’ve configured for virtual machine. For me 12 GB is the maximum value I could ever use so I’m using this value. Refer to Oracle documentation for swap size and always add 32 MB to value from documentation to meet Oracle Installer requirements. Remember, if you add physical RAM to your host (laptop or desktop server) you can add new disk, set it as physical volume and add to vg_root – then extend swap space. On-Line! This is one of the main reason to use LVM in production environment. Refer to LVM documentation to familiar yourself with a bigger picture of this utility.

Add another logical volume.
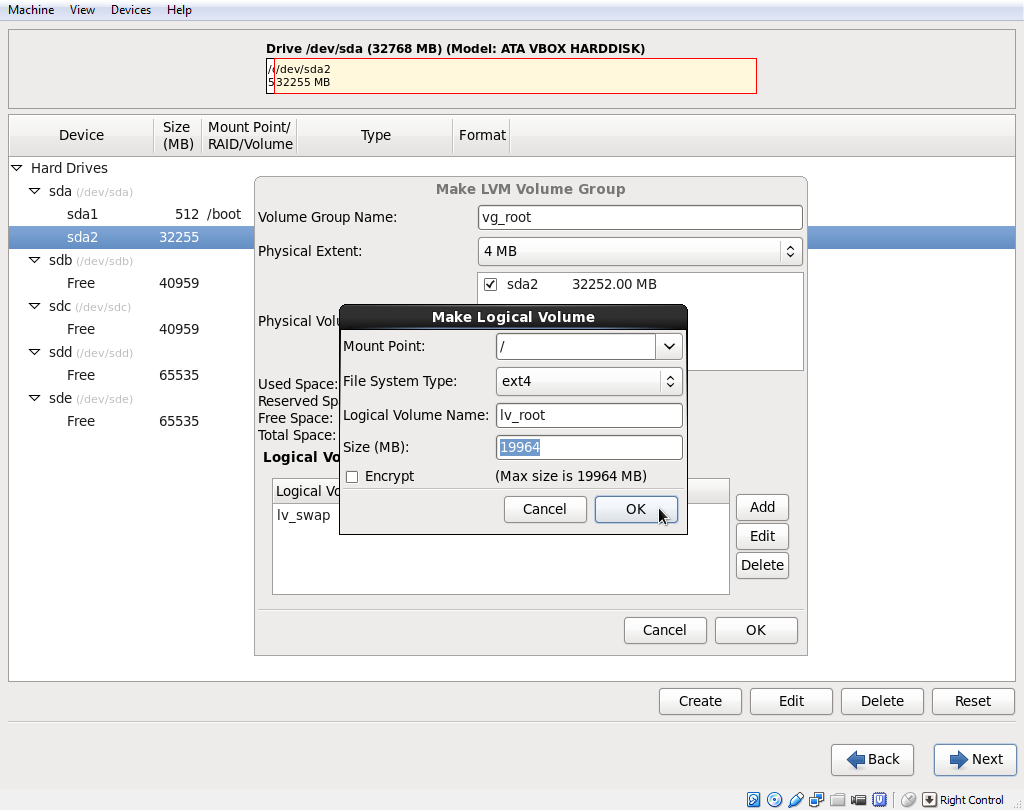
This will be your root file system – here all system binaries, logs and other files will go. For production environment it’s wise to separate some of the directories. For example /var/ directory can use your whole space and prevent you from using vi editor (no space on disk for edited copy as an example). As this is our test environment – we’ll go for only one big chunk of system space.
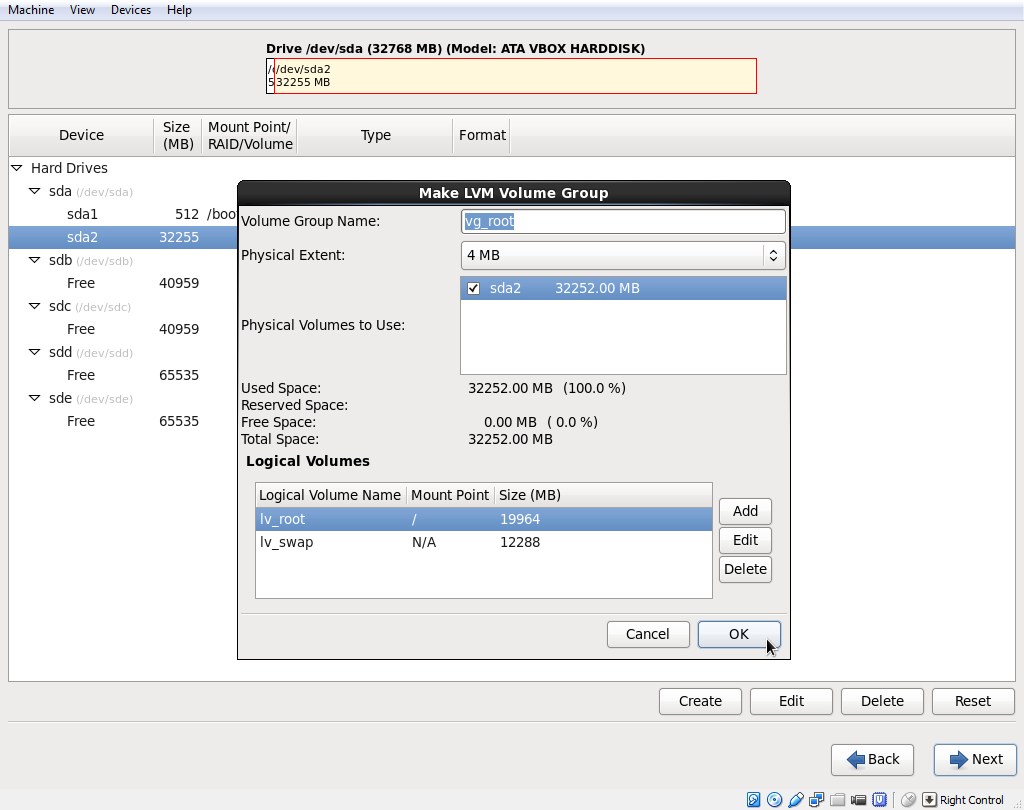
Two is the number which you prefer to do not complicate this situation too much. Hit OK button.

Right now leave other disks intact. We’ll deal with them later from command line. Hit next.

Format warnings – off course we would like to format those disks. Hit Format button.
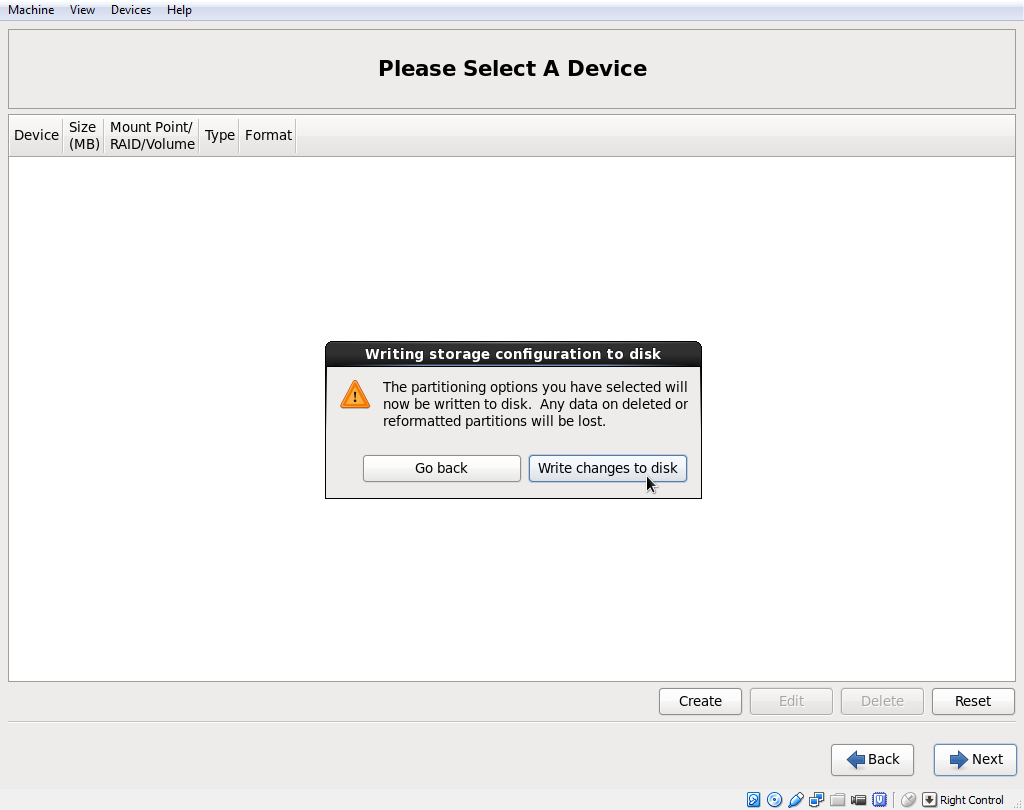
Yes, you are sure, that you want to destroy all of the data on those disks. Hit button with Write changes to disk.
Customizing your Minimal installation.
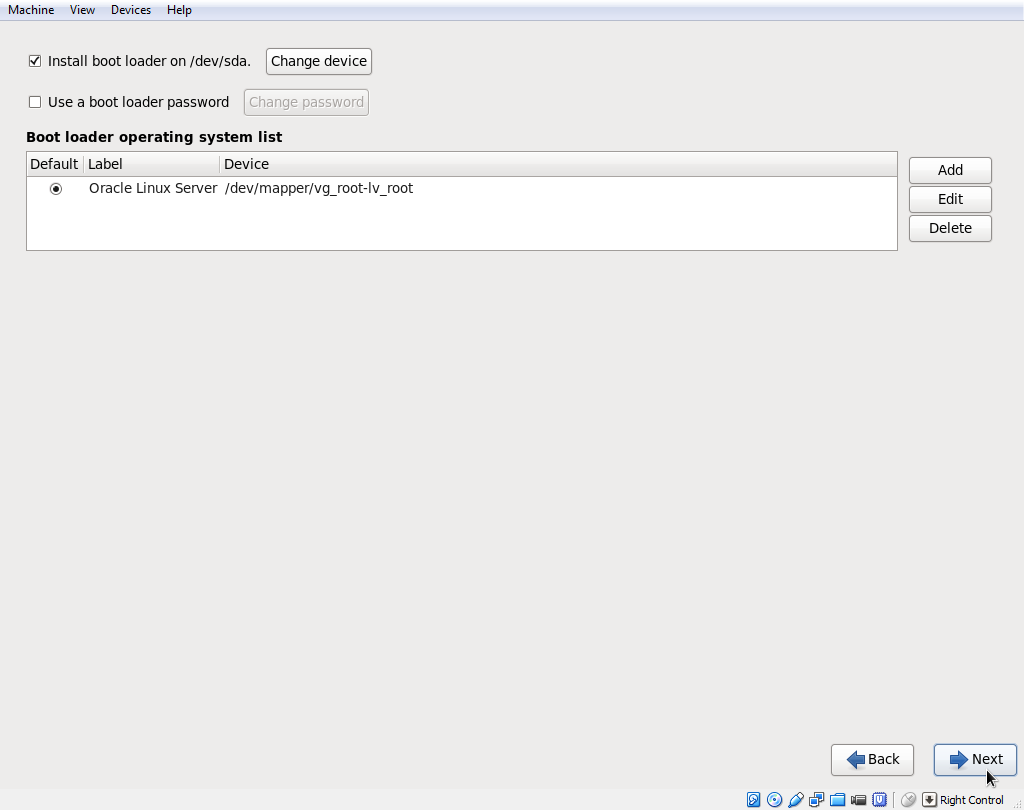
Our boot loader defines how we start our operating system. As a default we’re going to use grub and let it reside on /boot partition of sda disk. Hit next.
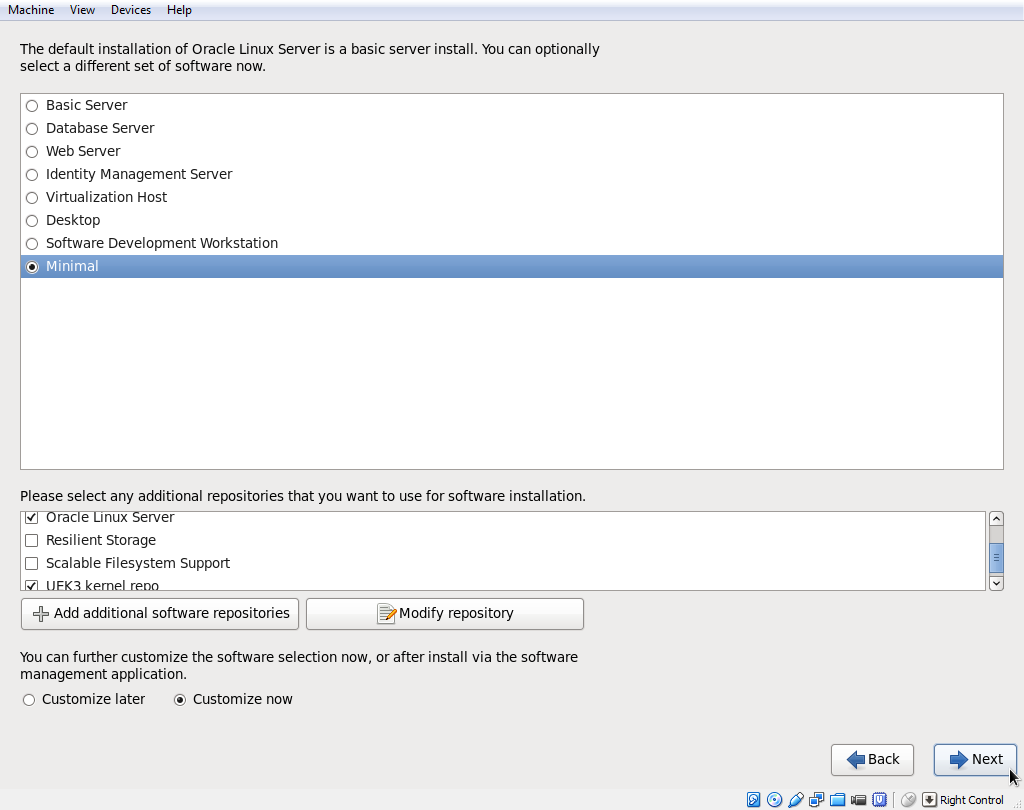
Choose Minimal installation, leave selected Oracle Linux Server and UEK3 kernel repositories. Choose to Customize now selection. Hit next button.
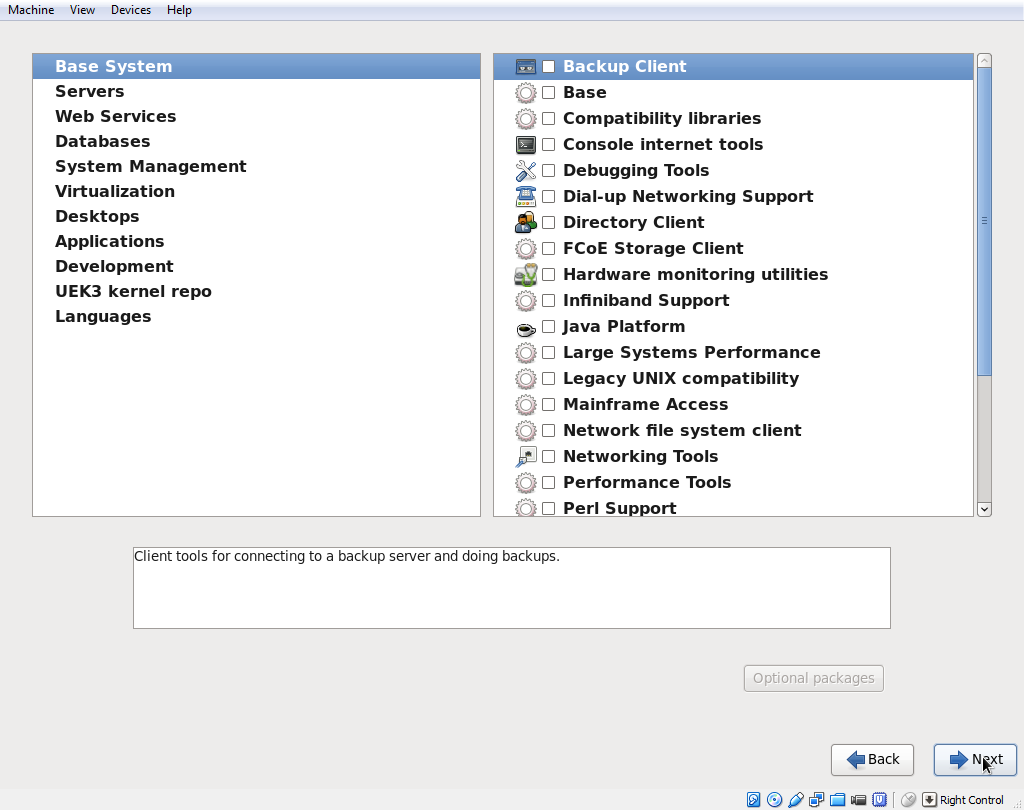
Customization through disregarding – hit next button.
Finishing
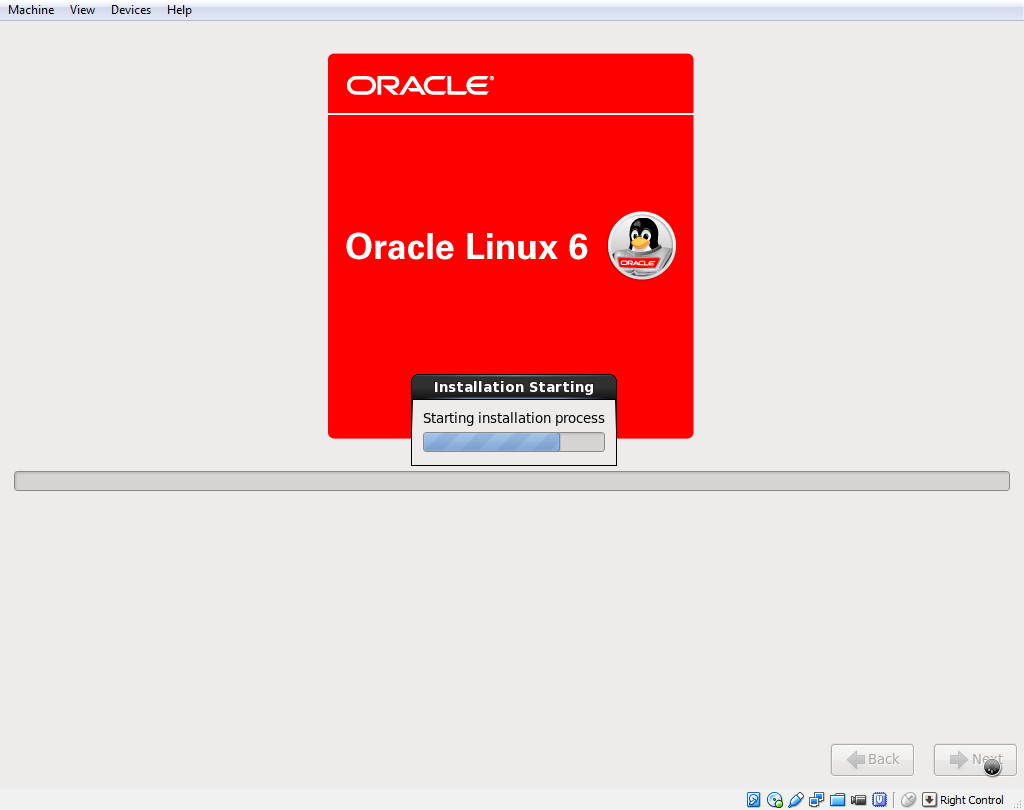
Installation is going to start in a matter of seconds.
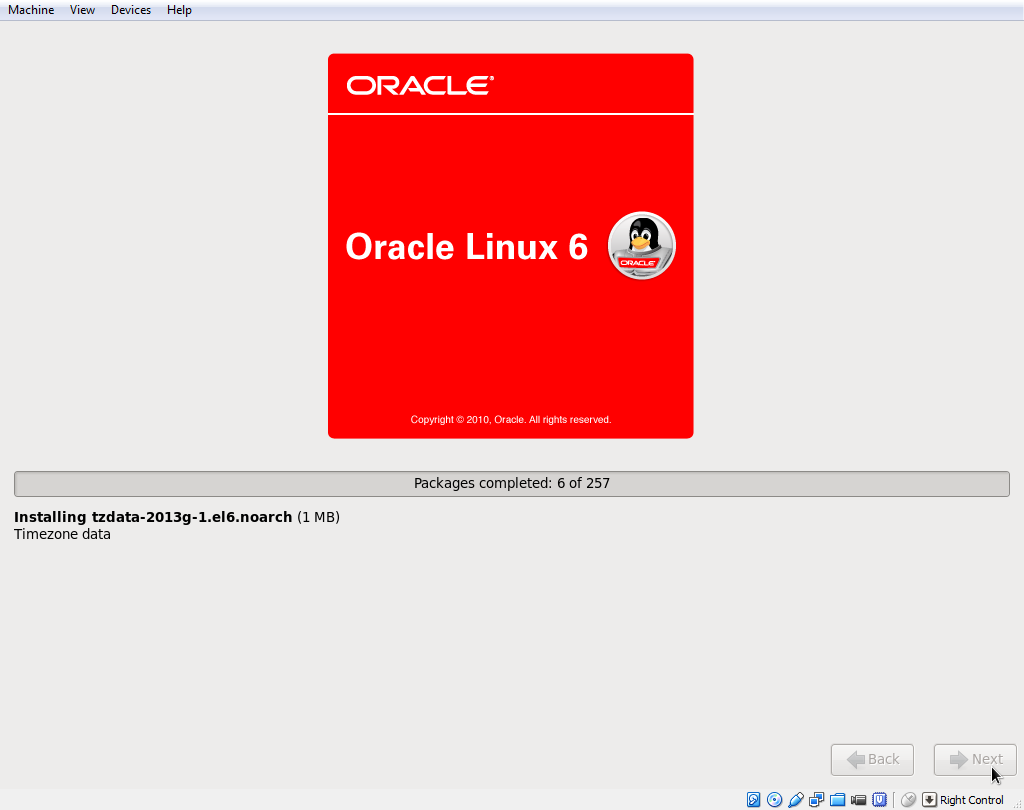
If you did everything similar to above steps you should see a total number of packages close to 257. This is a minimal installation of Oracle Linux 6.5.
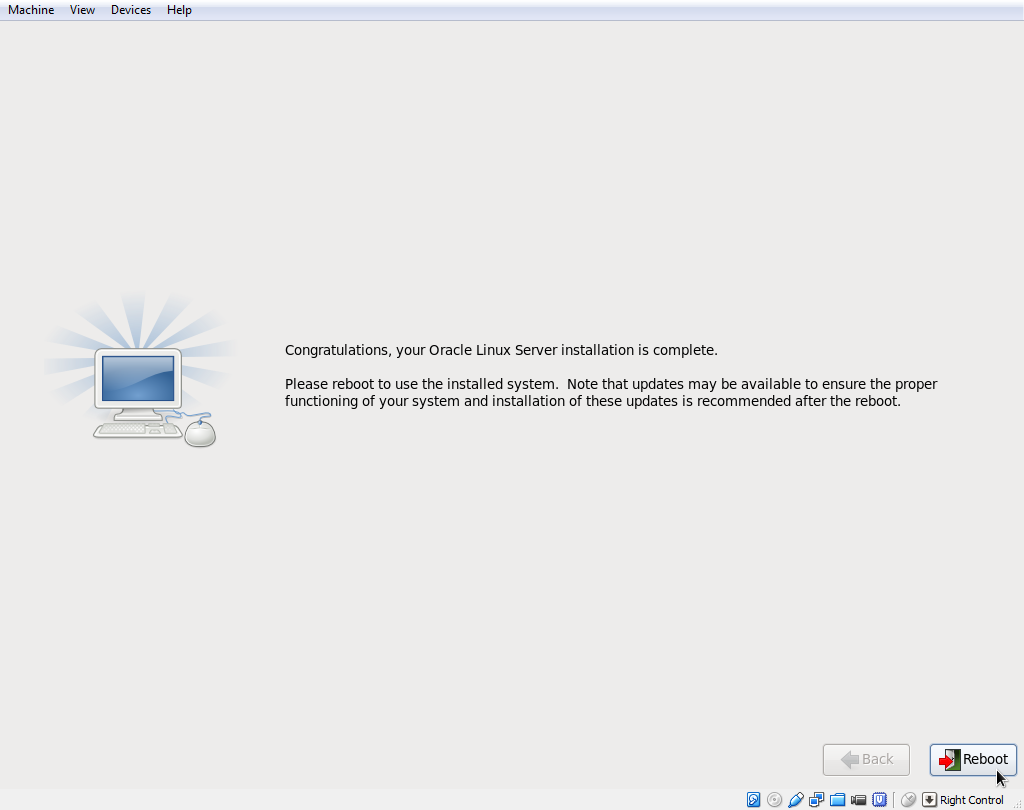
Congratulations – you did the first, easier part. Reboot to see the black and cold void of your Linux command line.
If you memorized or saved in a plain file your root password then you can login and celebrate your first victory.
Operating system configuration
Using command line we need to adjust some of the operating system configuration files. Install required by Oracle Database software packages and prepare for database creation.
Network configuration
For network I always use static configuration. I don’t need to connect anywhere beside other Virtual Machines. This is why in configuration I use Host-only network adapter. To let VM talk with host and other Virtual Machines.
You can set it up other way if you know, what are you doing. My set up is old one set up by someone, who knows much more than me about network. As long as it works I’m going to use it as a base configuration
In a file: /etc/sysconfig/network-scripts/ifcfg-eth0 put those lines with one exception highlighted below (*HWADDR is your own network card mac address which probably is different than presented one – you can find it in your Virtual Machine configuration in Virtual Box under Network tab).
DEVICE="eth0"
HWADDR="08:00:27:6E:78:7F"
NM_CONTROLLED="no"
ONBOOT="yes"
IPADDR=192.168.56.12
NETMASK=255.255.255.0
TYPE=Ethernet
GATEWAY=192.168.56.1
DNS1=192.168.56.1
IPV6INIT="no"
USERCTL="no"
For IPADDR you can choose other IP but change only last number betwen 1 and 128 – this way configuration wont mess up.
Edit next file: /etc/resolv.conf
nameserver 192.168.254.1
nameserver 192.168.56.1
If you’re not going to use DNS then you can change ssh deamon to do not search for it. This will prevent your putty session from hang after inputting your user name and awaiting for password prompt.
Edit file: /etc/ssh/sshd_config – find UseDNS entry, uncomment it and change value to no. You can yank this line and leave the default value commented in the file. Here is what you should have in your file:
#UseDNS yes
UseDNS no
Now it’s time for a test. Run those commands from root account:
service network restart
service sshd restart
You should see similar output (presented below) with couple OK confirmations for each part of network service restart procedure.
Shutting down interface eth0:                              [  OK  ]
Shutting down loopback interface:                          [  OK  ]
Bringing up loopback interface:                            [  OK  ]
Bringing up interface eth0:  Determining if ip address 192.168.56.12 is already in use for device eth0...
                                                           [  OK  ]
Stopping sshd:                                             [  OK  ]
Starting sshd:                                             [  OK  ]
If you enter one more command: ifconfig you should see in one of lines value with your IP address, like: inet addr:192.168.56.12. This way you know, that all is done properly. If not – check, if all files have been modified correctly. If this wont help you than you should refer to Oracle Linux documentation for more details about network configuration files.
Add entry in /etc/hosts with your host name
Edit your local hosts file to bound IP with your machine name. Insert this line below existing lines with localhost configuration.
vi /etc/hosts
192.168.56.12 odone
Putty connection
Now you can use putty to connect to this host. It’s move convenient to use putty – you can copy and paste commands through it. You can use Virtual Box bidirectional clipboard but for this you need to have Guest Additions Installed first. This is one of very last steps you’ll take in this tutorial.
Ok, putty configuration. Get putty from this site. For most people version “For Windows on Intel x86” in exe format is accurate. You can go for installer too which install much more than ssh client.
Here you can see main putty configuration page
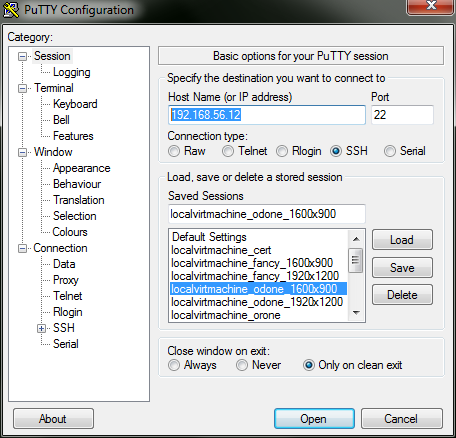
You don’t need here nothing more than an address which you’ve configured in ifcfg-eth0 file and a name for your connection. Click save after setting those two informations. Then leave selected this entry in a list and set other tabs with the same configuration you see on screens below.
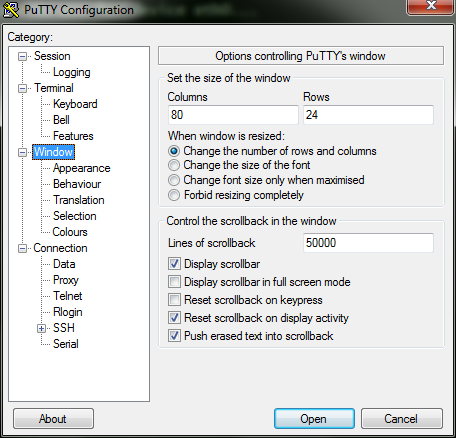
Window tab – set Lines of scrollback to keep last listings history. Very usefull. Size of window is only for start – you can always adjust it like other windows in your operating system.
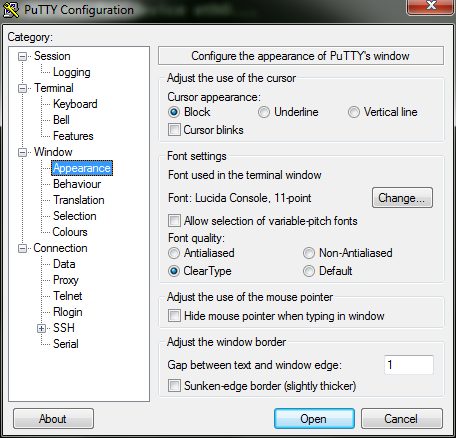
Appearance window give you all the details about output – remember to use monotype character set like Lucida Console or Courier New. Check ClearType or other options to smooth your output.
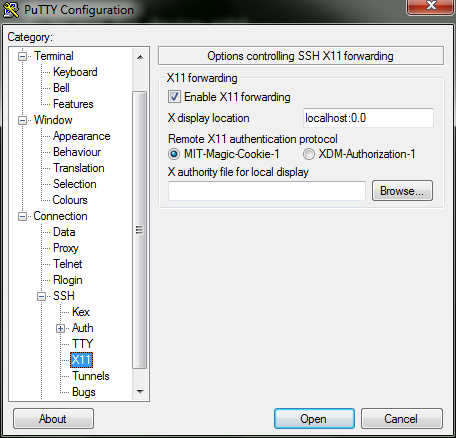
Here you need to enable X-11 forwarding. Our operating system haven’t got any X Window server installed and we leave it this way. We will use Xming windows server in your Windows machine.
When you set all options click Save on first tab which you’ve seen on first image. Then you can use this configuration for new connections to this machine. Give it a try and connect to your Virtual Machine. You should see similar prompt like in your Virtual Machine window but here you can copy&paste bidirectionally. And you can set your font and other cool features.
Xming – your X window server
Xming X Server for Windows is the easiest way to get remote windows from you Linux directly on your host. You can find install media by clicking here and in addition get fonts pack from here.
Just install in default directory Xming and then start Xming-fonts – take all fonts and install in Xming software directory (this is the default).
After installation find XLaunch shortcut in your start menu and hit it. On short series of images below you can see how to configure it. Pay attention to all checkers.
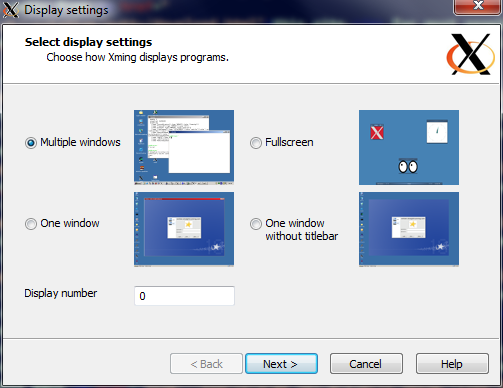
Starting screen. Here you can choose Xming behaviour – we’ll use multiple windows and our display should be set to zero. In short: leave all options with default values.
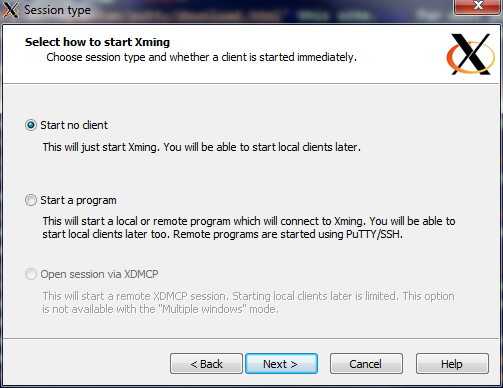
Choose if you like to start any program from your remote machine – we will send screen remotly from our Linux to host. Leave all options with default values.
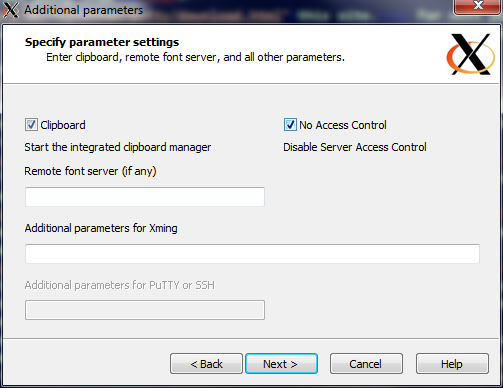
Check No Access Control checker and hit next.
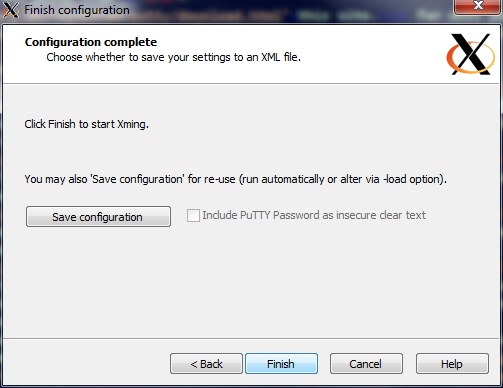
Almost finished – you can save this configuration and then use this saved file as a configuration file. Just hit it and you’ll get started Xming with your configuration. Hit Finish button to end this wizard.
After program ends you can find on your system tray little Icon with X character. This means that server is working. You need start it each time you end it deliberately by rmb click and choose from menu exit or after your host restart.
Local repository with install media
As stated before, I’m using my Virtual Machines locally only. This means, there is no need to connect to internet and download anything from network. If I need to deliver anything to my Linux then I share directory and use it inside Virtual Machine as a local directory.
Use your favourite Linux text editor and create new file for your local repository.
vi /etc/yum.repos.d/local-6.5-x64.repo
Put these lines in the file.
[local-6.5-x64]
name=Local Linux 6.5 x64
baseurl=file:///iso-oel-x64-6.5
gpgkey=file:///etc/pki/rpm-gpg/RPM-GPG-KEY
gpgcheck=1
enabled=1
This means, that we will use local-6.5-x64 as our local repository with a given name Local Linux 6.5 x64. Base url is for local directory with copied install media (whole DVD, not only packages) and we will use gpg key. Last two flags means that we would like to use a gpg key and this whole entry is enabled too. If we want to disable repository just change enabled from 1 to 0 and yum will skip searching this location for packages.
Update default repositories – we don’t need them any more. Change enabled flag from any value to zero (even if it’s set to some $variable value – just copy/paste this line by yanking, comment original one and leave new one with enabled=0). Here is a file with default repositories:
vi /etc/yum.repos.d/public-yum-ol6.repo
Sample entry for UEK with changes with comment in line 6 and new line 7 with zeroed flag.
[public_ol6_UEK_latest]
name=Latest Unbreakable Enterprise Kernel for Oracle Linux $releasever ($basearch)
baseurl=http://public-yum.oracle.com/repo/OracleLinux/OL6/UEK/latest/$basearch/
gpgkey=http://public-yum.oracle.com/RPM-GPG-KEY-oracle-ol6
gpgcheck=1
#enabled=$uek
enabled=0
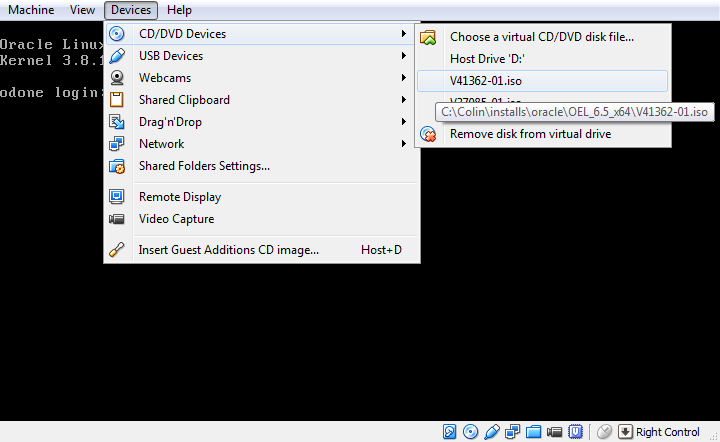
Insert DVD to your virtual drive and mount it in Linux. To do this use Virtual Machine menus, find Storage settings tab and your virtual drive. Then mount image by selecting it just like for the installation you’ve just made. Look on an image below if you cannot find this option.
Almost there – mount your DVD in media directory from root account with a command:
mount /dev/dvd /media
If you received error close to “mount: /dev/sr0 already mounted or /media busy” try to execute the mount command again.
Create new directory in your / (root) directory and copy all files.
mkdir /iso-oel-x64-6.5
cp -pr /media/* /iso-oel-x64-6.5
Refresh yum repositories.
yum clean all
And you’re ready to use your local repository. No need to use network to install anything. No way to confuse editions and mess up your repository. Hermetic installation from just one DVD. This is all you need for a simple test environment.
Install required packages
Change your working directory to directory with your packages. We need to be inside this directory to install UEK devel package.
cd /iso-oel-x64-6.5/Packages
Just copy&paste this command to your putty session:
yum install openssh-clients kernel-uek-devel* compat-libcap1 compat-libstdc++-33.x86_64 compat-libstdc++-33.i686 gcc-c++ xorg-x11-apps xorg-x11-xauth xorg-x11-utils libaio-devel libaio libXtst sysstat nfs-utils ksh oracleasm-support zip unzip man
This should be one line command. In summary I’ve seen 60 packages to install – if you have any yum issues then check, if all public repositories are disabled and retry command. Remember to go to Packages directory in your local repository first.
Transaction Summary
===========================================================================================
Install      60 Package(s)

Total size: 49 M
Total download size: 17 M
Installed size: 84 M
When using yum for the first time to install anything he can ask you to accept local gpg key. Answer yes for this question and then again yes for question about install plan.
Create disks and filesystems
For disks sdb, sdc and add we’ll use LVM. sde disk need to be prepared with standard fdisk tool.
Create all physical volumes for later use by volume manager.
pvcreate /dev/sdb /dev/sdc /dev/sdd
Create volume groups
vgcreate vg_orahome /dev/sdb --physicalextentsize 8m
vgcreate vg_oradata /dev/sdc --physicalextentsize 8m
vgcreate vg_fra /dev/sdd --physicalextentsize 8m
Check available space for new partition.
vgdisplay --units m vg_orahome | grep Size
vgdisplay --units m vg_oradata | grep Size
vgdisplay --units m vg_fra | grep Size
Create logical volume with full size of each disk.
lvcreate -L 40952m -n lv_orahome vg_orahome
lvcreate -L 40952m -n lv_oradata vg_oradata
lvcreate -L 65528m -n lv_fra vg_fra
Check logical volumes.
lvdisplay /dev/vg_orahome/lv_orahome --units m
lvdisplay /dev/vg_oradata/lv_oradata --units m
lvdisplay /dev/vg_fra/lv_fra --units m
Create filesystems.
mkfs.ext4 /dev/vg_orahome/lv_orahome
mkfs.ext4 /dev/vg_oradata/lv_oradata
mkfs.ext4 /dev/vg_fra/lv_fra
Check if you can mount it, if yes, add entry to your fstab configuration file.
mkdir /u01
mkdir /u02
mkdir /u03
mount /dev/vg_orahome/lv_orahome /u01
mount /dev/vg_oradata/lv_oradata /u02
mount /dev/vg_fra/lv_fra /u03
df -h /u01 /u02 /u03
Filesystem                         Size  Used Avail Use% Mounted on
/dev/mapper/vg_orahome-lv_orahome   40G   18G   20G  48% /u01
/dev/mapper/vg_oradata-lv_oradata   40G  3.5G   34G  10% /u02
/dev/mapper/vg_fra-lv_fra           63G  317M   60G   1% /u03
vi /etc/fstab
Add similar lines.
/dev/mapper/vg_orahome-lv_orahome       /u01    ext4    defaults        0       0
/dev/mapper/vg_oradata-lv_oradata       /u02    ext4    defaults        0       0
/dev/mapper/vg_fra-lv_fra       /u03    ext4    defaults        0       0
Check fstab entry by unmounting and then mounting back your disks. There is no information what and where we would like to mount – those informations are read from fstab file.
umount /u01
umount /u02
umount /u03
mount /u01
mount /u02
mount /u03
LVM gives you many interesting features, for instance, an ability to extend filesystem on-line with new physical volume. Check Linux documentation for more in depth knowledge about it.
Now we prepare a whole disk partition for ASM.
Start fdisk – legacy tool for managing disk partitions. For ASM it’s safer to use fdisk instead logical volumes on LVM.
fdisk /dev/sde
Choose p to show current partition table on this disk. Then create new partition with n, partition number 1, then enter to select maximum, default value, use w to write changes on disk and quit from fdisk. If there is no option used (*visible one) I’ve only hit enter for default values (First and Last cylinder).
WARNING: DOS-compatible mode is deprecated. It's strongly recommended to
         switch off the mode (command 'c') and change display units to
         sectors (command 'u').

Command (m for help): p

Disk /dev/sde: 68.7 GB, 68719476736 bytes
255 heads, 63 sectors/track, 8354 cylinders
Units = cylinders of 16065 * 512 = 8225280 bytes
Sector size (logical/physical): 512 bytes / 512 bytes
I/O size (minimum/optimal): 512 bytes / 512 bytes
Disk identifier: 0xedeff186

   Device Boot      Start         End      Blocks   Id  System

Command (m for help): n
Command action
   e   extended
   p   primary partition (1-4)
p
Partition number (1-4): 1
First cylinder (1-8354, default 1):
Using default value 1
Last cylinder, +cylinders or +size{K,M,G} (1-8354, default 8354):
Using default value 8354

Command (m for help): w
The partition table has been altered!

Calling ioctl() to re-read partition table.
Syncing disks.
And that’s all for now for partition for ASM. We will continue work with it later, after Oracle Grid Infrastructure install.
Groups and users
We will use separated users and roles in our installation. This way we can go further with it and later create dedicated users for each of three new operating system privileges.
groupadd -g 1000 oinstall
groupadd -g 1010 dba
groupadd -g 1011 oper
groupadd -g 1012 backupdba
groupadd -g 1013 dgdba
groupadd -g 1014 kmdba
groupadd -g 1020 asmdba
groupadd -g 1021 asmadmin
groupadd -g 1022 asmoper
useradd -u 1100 -g oinstall -G dba,oper,asmdba,backupdba,dgdba,kmdba oracle
useradd -u 1101 -g oinstall -G asmadmin,asmdba,asmoper,dba grid
User limits
According to documentation you should change shell limits for your user. To do this edit appropriate file. Put those lines in a limits.conf file just between two comments.
vi /etc/security/limits.conf
#@student        -       maxlogins       4

oracle          soft    nofile          1024
oracle          hard    nofile          65536
oracle          soft    nproc           2047
oracle          hard    nproc           16384
oracle          soft    stack           10240
oracle          hard    stack           32768

grid    soft    nofile          1024
grid    hard    nofile          65536
grid    soft    nproc           2047
grid    hard    nproc           16384
grid    soft    stack           10240
grid    hard    stack           32768

# End of file
For operating system parameters we will just use fix-up script. It’s much more convinient to use it instead checking all the parameters and set it manually in system configuration file.
Install virtual box guest additions
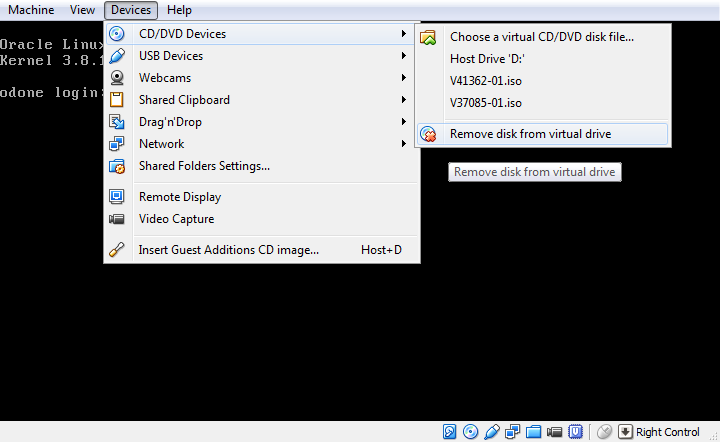
Remove install media with eject in virtual box settings. Then insert virtual box guest additions CD, copy files and install them.
umount /media
mkdir /vboxadd
Now it’s a good time to remove currently inserted CD from virtutal drive and insert guest additions CD from your Virtual Machine menu. Take a look on two images below.
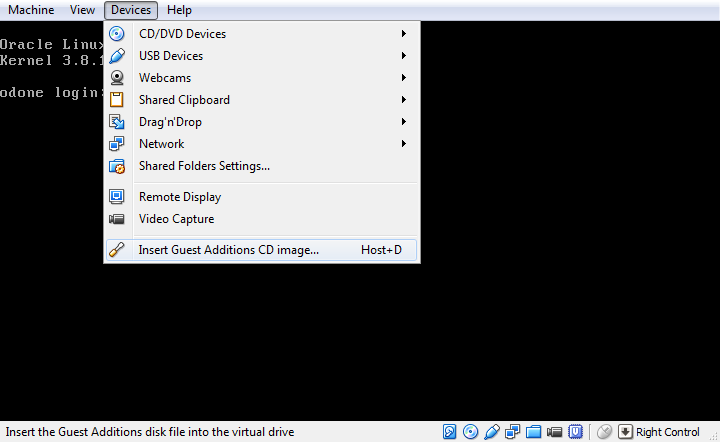
Finish activities with those commands. If you’ll get error with first command try to execute it again.
mount /dev/dvd /media
cp -pr /media/* /vboxadd
cd /vboxadd
sh VBoxLinuxAdditions.run
For almost all positions in Guest Additions compilation you should see green [ OK ] in your output. For Window System drivers there won’t be any X.Org or XFree86 libraries – this part will be skipped – it’s perfectly normal.
Configure oracleasm
For ASM configuration use IDs of user and group, not their names.
/usr/sbin/oracleasm configure -i
In each line answer with correct user and group ID. Configure to start ASM library after restart.
Default user to own the driver interface []: 1101
Default group to own the driver interface []: 1021
Start Oracle ASM library driver on boot (y/n) [n]: y
Scan for Oracle ASM disks on boot (y/n) [y]: y
Create ASM disk /dev/sde1 to be available as a candidate for Oracle ASM library. When we’ve created partition on sde disk then in /dev/ a new entry point have been created – /dev/sde1. We will use it now.
Restart oracleasm module before beginning and then create disk.
/usr/sbin/oracleasm exit
/usr/sbin/oracleasm init
/usr/sbin/oracleasm createdisk ASM_DG_EXT /dev/sde1
Check list of your available disks for ASM instance.
oracleasm listdisks
ASM_DG_EXT
Directories and users adjustment
Modify oracle and grid users to gain access to shared folders and change directories ownership and set passwords for oracle and grid users.
usermod -u 1100 -g oinstall -G dba,oper,asmdba,backupdba,dgdba,kmdba,vboxsf oracle
usermod -u 1101 -g oinstall -G asmadmin,asmdba,asmoper,dba,vboxsf grid
mkdir -p /u01/app/grid
chown -R oracle:oinstall /u01
chown -R grid:oinstall /u01/app/grid
mkdir /u01/app/stage
chown oracle:oinstall /u01/app/stage
chmod 775 /u01/app/stage
chmod 776 /u01/app
chown oracle:oinstall /u02
chown oracle:oinstall /u03
passwd oracle
passwd grid
SELinux and Firewall
As this will be only test environment and my personal Virtual Machine there is no need to fight with SELinux and Firewall during any database activities. I’m disabling both services as a rule in such situations.
Remove rhgb flags from /etc/grub.conf file to disable red hat graphical boot – this is my personal choose, you can leave it as it is
vi /etc/grub.conf
To disable SELinux edit /etc/selinux/config file and change one line which starts with SELINUX= with this one.
vi /etc/selinux/config
SELINUX=disabled
Check current state of iptables service responsible for network rules (or just Firewall).
chkconfig --list iptables
chkconfig iptables off
chkconfig --list iptables
Now it’s a good moment to restart your Virtual Machine.
shutdown -r now
After restart you should have similar result for used memory.
free
             total       used       free     shared    buffers     cached
Mem:      10240044     167952   10072092          0       7892      42368
-/+ buffers/cache:     117692   10122352
Swap:     12582908          0   12582908
Before you start Grid Infrastructure installation
If your host is low on memory then probably your virtual machine won’t get any more than 2GB of memory for installation. It’s below Oracle’s recommendations mainly because shared memory. You need to have at least 1.5GB designated for shared segments. Check, what is your current value. From root account session:
df -h /dev/shm
Filesystem      Size  Used Avail Use% Mounted on
tmpfs           4.9G  3.0G  2.0G  61% /dev/shm
As a default Linux system assign half of your physical memory for shared segments. For Oracle Database I usually use value of 70-80% of the physical memory. This way I can start the Database with higher value for MEMORY_MAX_TARGET and then dynamically use MEMORY_TARGET to adjust memory to expected value when using Automatic Memory Management.
If your physical memory is 2GB then adjust /etc/fstab entry to assign more to /dev/shm device, for example 1536m. You can find more information about it in Oracle Linux documentation.
vi /etc/fstab
tmpfs /dev/shm tmpfs defaults 0 0
This line can be adjust with size attribute. For example, I can set my virtual machine shared memory to 7168M (7GB).
tmpfs /dev/shm tmpfs defaults,size=7168m 0 0
Oracle Grid Infrastructure installation
If your Xming server is not yet started than this is the right moment. Start new putty window and login as grid user to your Virtual Machine.
My shared directory is called oracle. Inside it I’ve got database directory various install media. We’re going to use stage directory which we’ve created earlier as a buffer for decompressed installation software.
cd /media/sf_oracle/database/linux_x64_12.1.0.2.0/
unzip p17694377_121020_Linux-x86-64_3of8.zip -d /u01/app/stage/
unzip p17694377_121020_Linux-x86-64_4of8.zip -d /u01/app/stage/
cd /u01/app/stage/grid/
If you did everything as shown above then it’s time to start installer and follow the white rabbit. Or the screens below. Choose wisely.
./runInstaller

We’re going to install and configure ASM instance in one step from OUI.
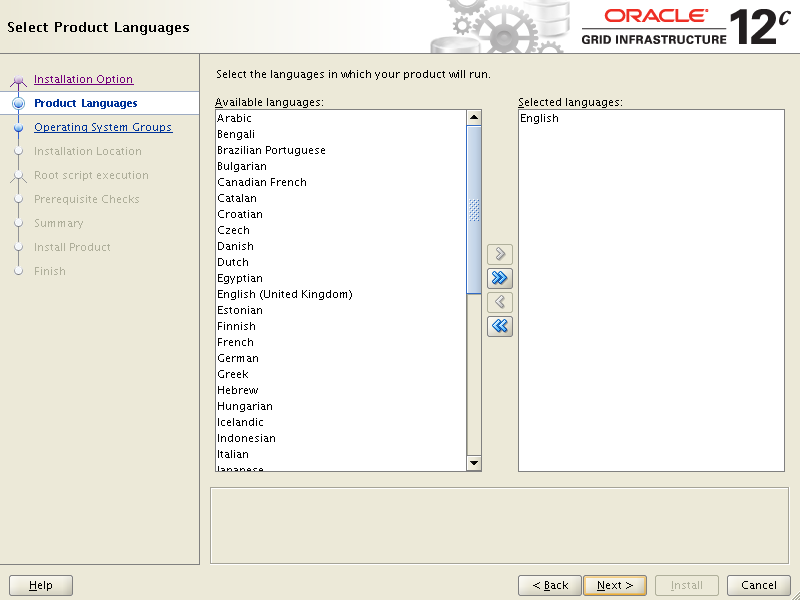
English is sufficient for most installations.
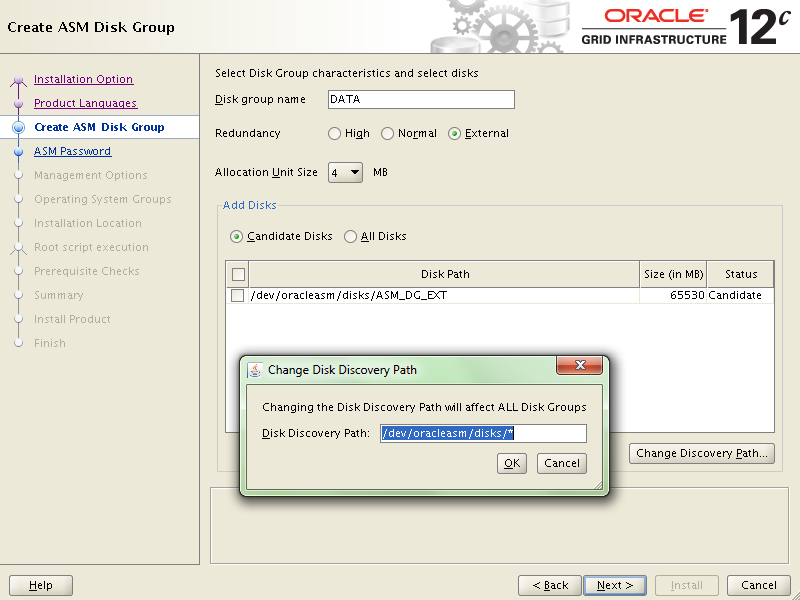
Create ASM disk group – for this click on Change Discovery Path and put in a field value /dev/oracleasm/disks/* – this is the place where disks created with oracleasm support package will put links to real devices.
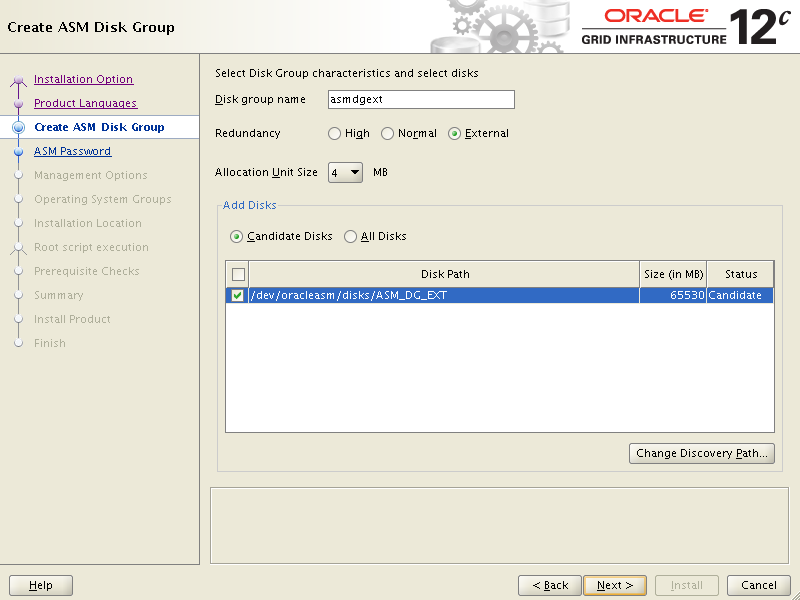
Change your disk group name to designate that this is external redundancy disk group. Change redundancy to external as we don’t need to have here normal or high data protection. In list you should see our disk ASM_DG_EXT – select checkbox next to the path and hit next.
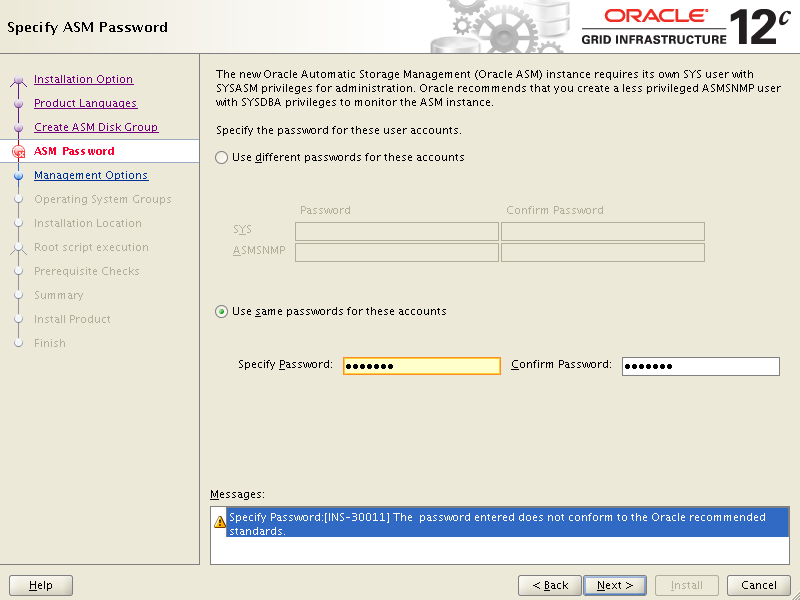
Specify administrative password.
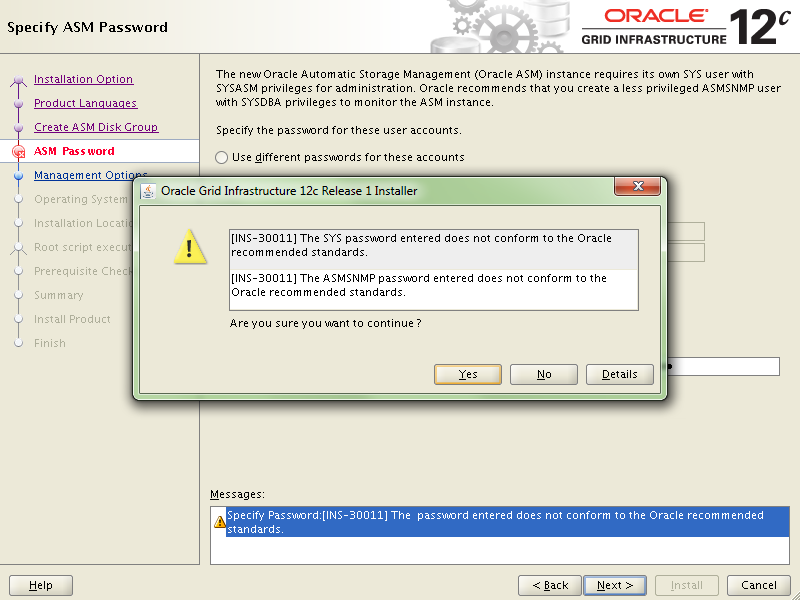
If your password is easy to remember then Oracle always let you know, that it’s too simple password. If you value your security – remember to change this password to better one.
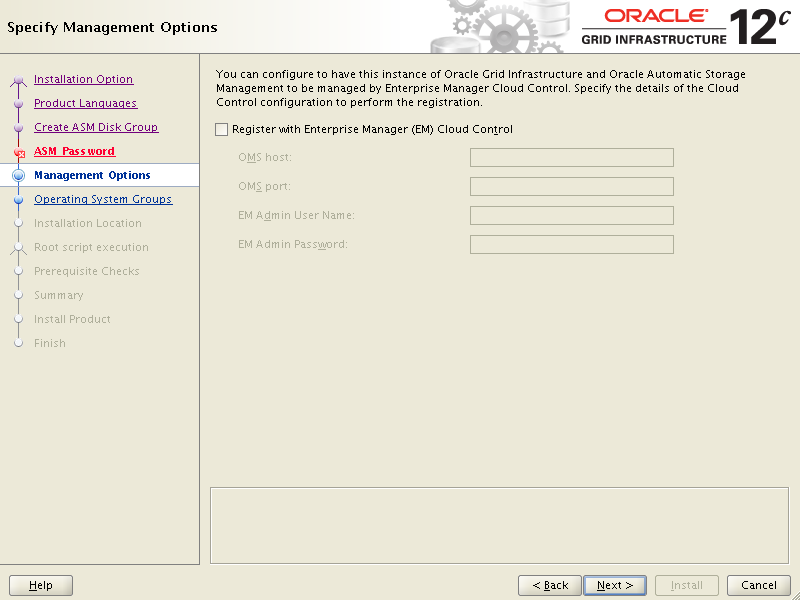
We do not need to register with Cloud Control. Maybe some other time (I’m planning another article with CC install too but I don’t know when it’ll happen).
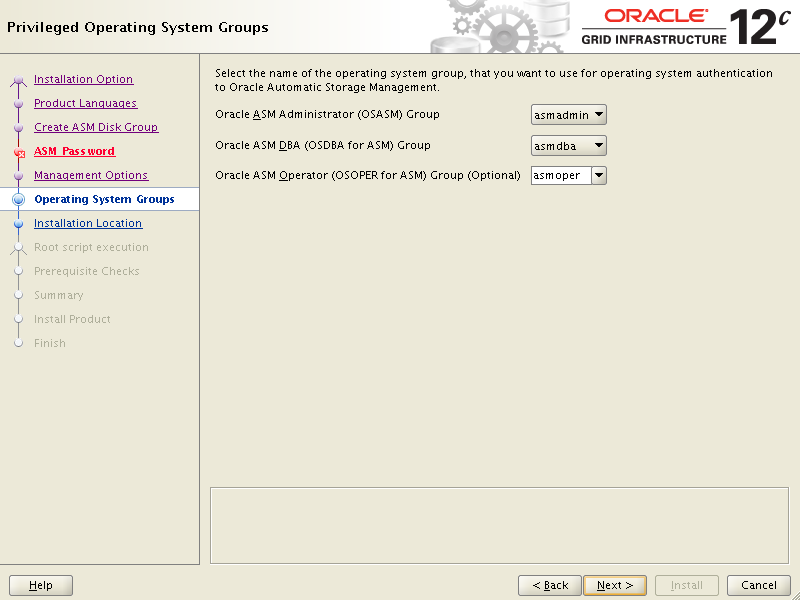
We are good to select roles as selected on screen. We’ve created those groups earlier and assign asmadmin and asmdba to oracleasm package.
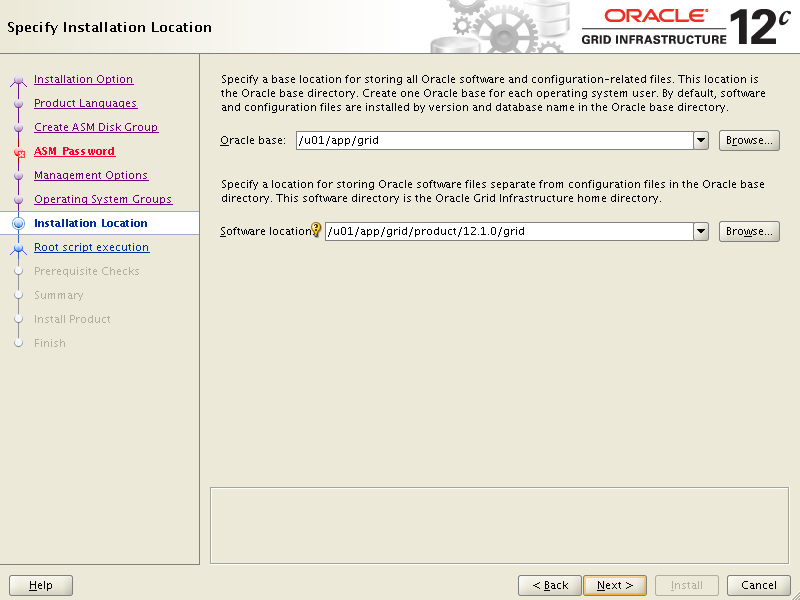
Oracle Home for grid infrstructure – just input /u01/app/grid and /u01/app/grid/product/12.1.0/grid should be choosen automatically.
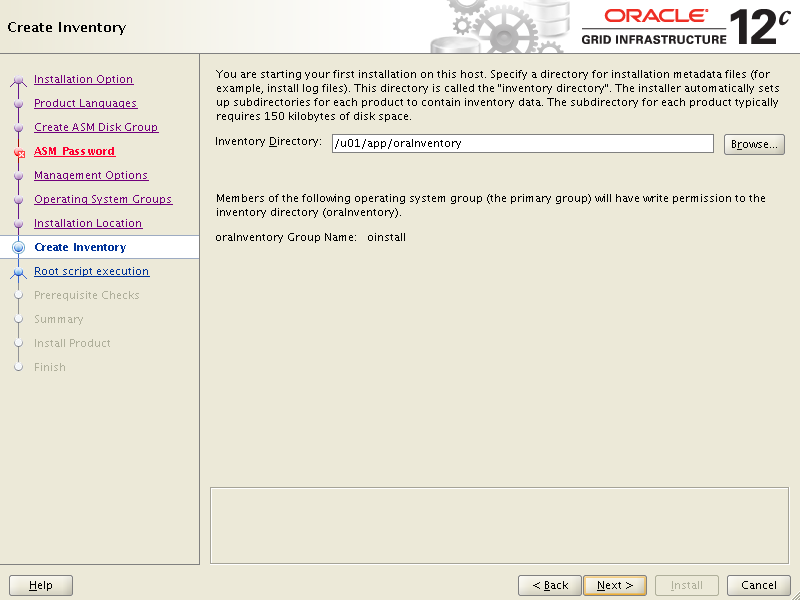
As this is first installation of Oracle Software on this machine we need to choose directory for Oracle Inventory. As a default oinstall group will be choosen for inventory administrative group. /u01/app/oraInventory is one directory up from your Oracle Home for Grid Infrastructure and it’s good to leave it as it is.
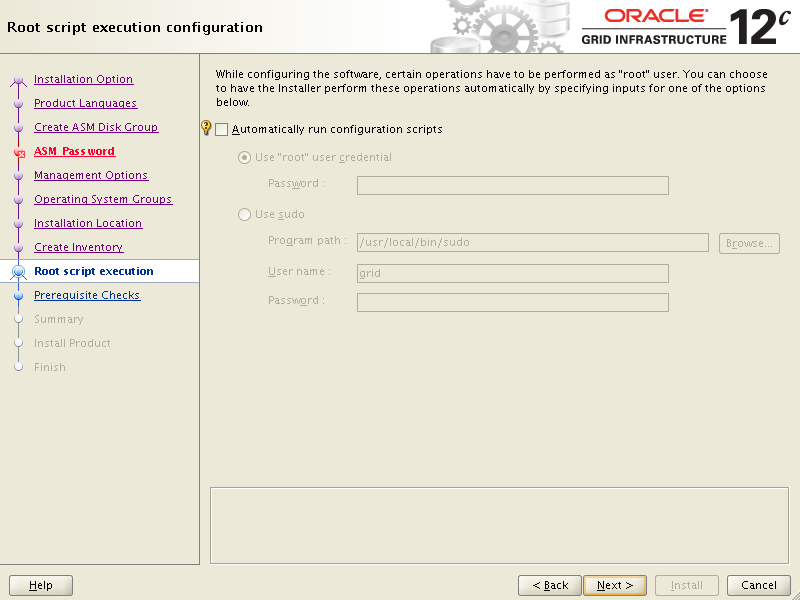
We could use new option for installer – put root password to use it in last step – this time we won’t use this feature.
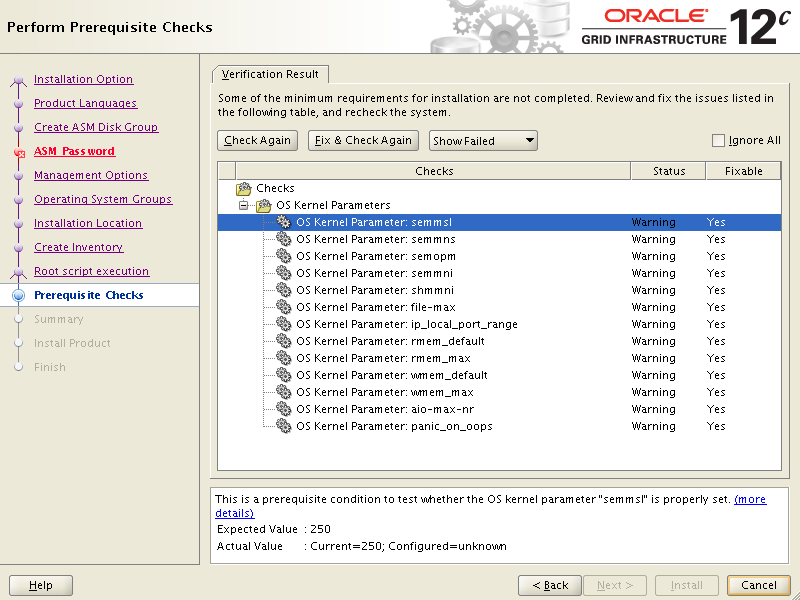
All checks should be green beside kernel parameters. Click on Fix & Check Again. You should see next window pop-up in front.

Execute pointed script to adjust kernel parameters. Just input in your root session in other putty window:
/tmp/CVU_12.1.0.2.0_grid/runfixup.sh
In window you should see some comments from script and then hit OK. Focus will return to main screen of OUI and all checks should be green right now. Oracle will proceed to next screen and won’t bother you anymore about prerequisites.
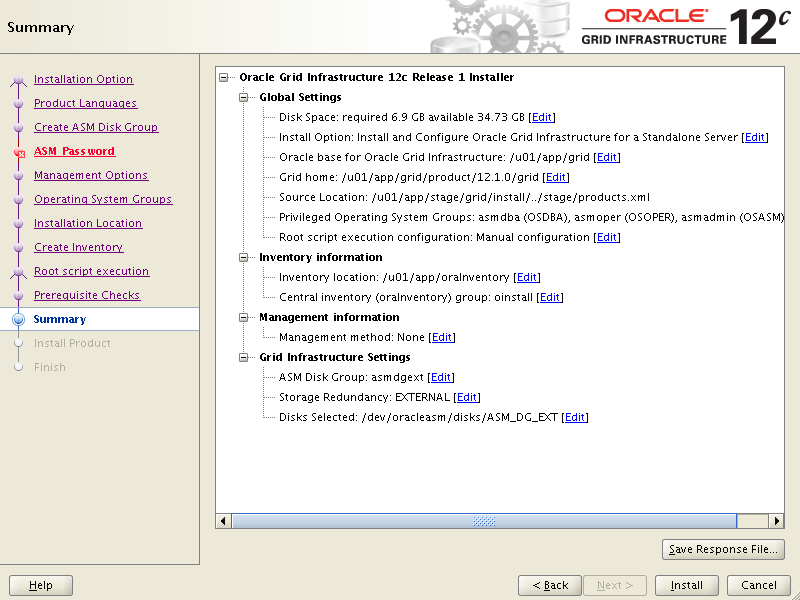
Summary screen – just hit Install and watch the hypnotizing progress bar.
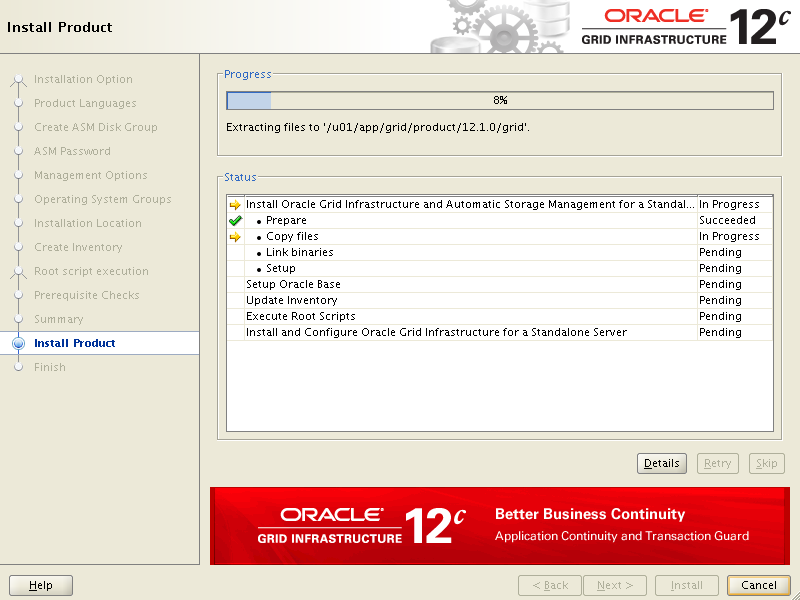
8% and still counting…
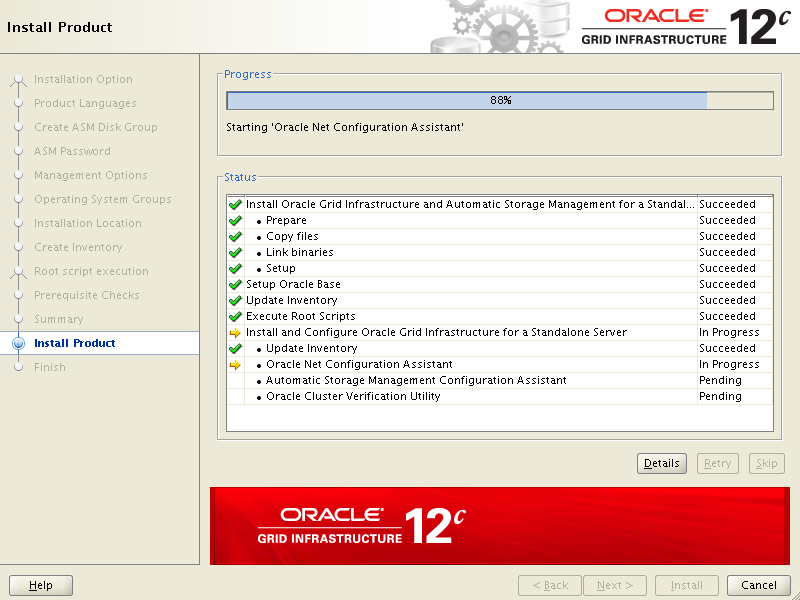
After copying files and linking libraries in /lib directory Oracle will start silently couple more activities like setting up listener in your Oracle Home for Grid Infrastructure.
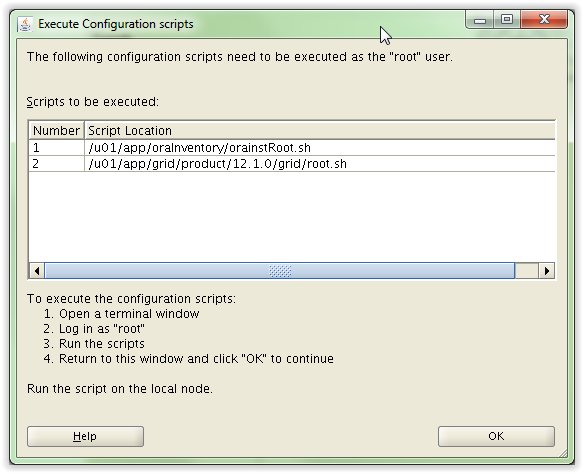
One of the steps will force you to use your root session to execute two scripts, one for Oracle Inventory directory and second for Oracle scripts which will be available for all users in /usr/local/bin directory and registration of cluster services.
/u01/app/oraInventory/orainstRoot.sh
/u01/app/grid/product/12.1.0/grid/root.sh
After second script you should see an information: “Successfully configured Oracle Restart for a standalone server”.
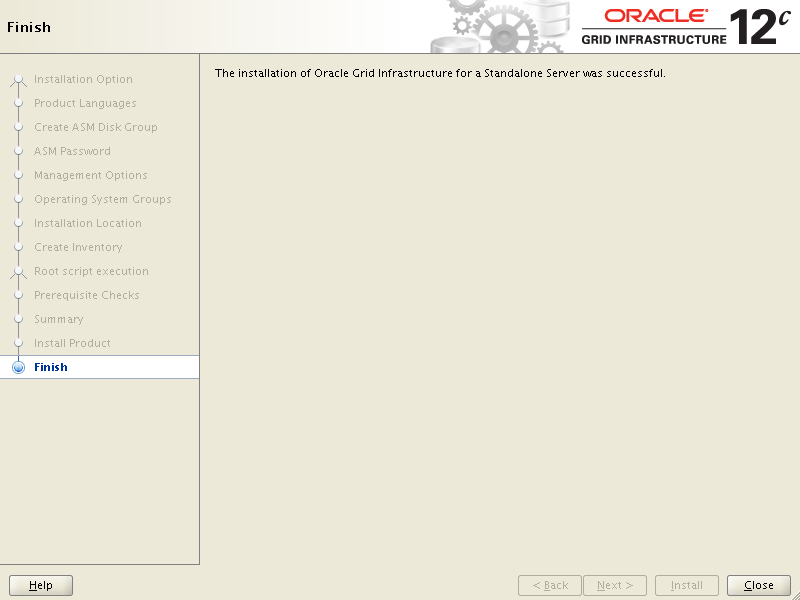
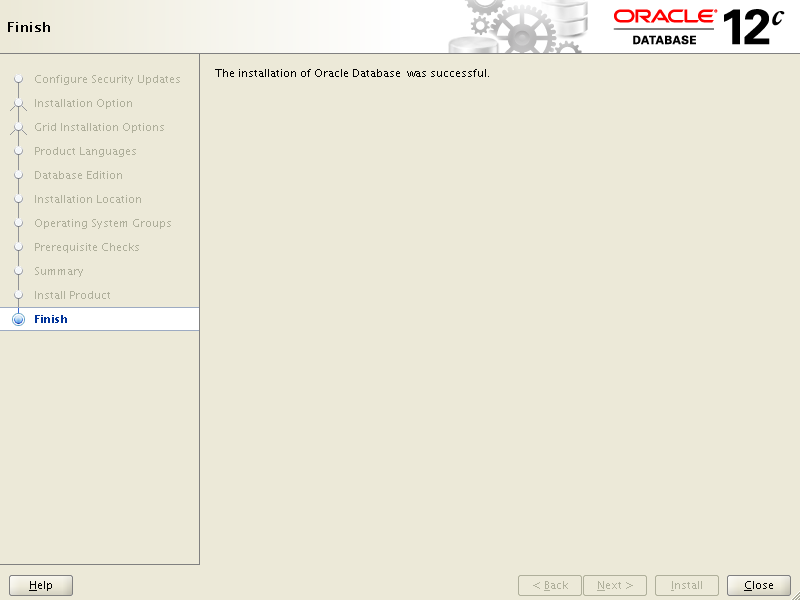
And that’s it. OUI finished his work. Click OK in script page and installer page.
As a result you can leave installer and use oraenv script, change your environment and check processes started by grid user.
. oraenv
ORACLE_SID = [grid] ? +ASM
The Oracle base has been set to /u01/app/grid
ps -ef | grep grid
After this command you should see a list similar to this one:
grid      1428     1  2 21:05 ?        00:00:05 /u01/app/grid/product/12.1.0/grid/bin/ohasd.bin reboot
grid      1534     1  1 21:05 ?        00:00:03 /u01/app/grid/product/12.1.0/grid/bin/oraagent.bin
grid      1549     1  1 21:05 ?        00:00:03 /u01/app/grid/product/12.1.0/grid/bin/evmd.bin
grid      1553     1  0 21:05 ?        00:00:00 /u01/app/grid/product/12.1.0/grid/bin/tnslsnr LISTENER -no_crs_notify -inherit
root      1569  1305  0 21:05 ?        00:00:00 sshd: grid [priv]
grid      1572  1549  1 21:05 ?        00:00:03 /u01/app/grid/product/12.1.0/grid/bin/evmlogger.bin -o /u01/app/grid/product/12.1.0/grid/log/[HOSTNAME]/evmd/evmlogger.info l /u01/app/grid/product/12.1.0/grid/log/[HOSTNAME]/evmd/evmlogger.log
grid      1579  1569  0 21:06 ?        00:00:00 sshd: grid@pts/0
grid      1580  1579  0 21:06 pts/0    00:00:00 -bash
grid      1631     1  0 21:07 ?        00:00:00 /u01/app/grid/product/12.1.0/grid/bin/cssdagent
grid      1657     1  1 21:07 ?        00:00:01 /u01/app/grid/product/12.1.0/grid/bin/ocssd.bin
grid      1792     1  0 21:08 ?        00:00:00 asm_pmon_+ASM
grid      1794     1  0 21:08 ?        00:00:00 asm_psp0_+ASM
grid      1796     1  9 21:08 ?        00:00:04 asm_vktm_+ASM
grid      1800     1  0 21:08 ?        00:00:00 asm_gen0_+ASM
grid      1802     1  0 21:08 ?        00:00:00 asm_mman_+ASM
grid      1806     1  0 21:08 ?        00:00:00 asm_diag_+ASM
grid      1808     1  0 21:08 ?        00:00:00 asm_dia0_+ASM
grid      1810     1  0 21:08 ?        00:00:00 asm_dbw0_+ASM
grid      1812     1  0 21:08 ?        00:00:00 asm_lgwr_+ASM
grid      1814     1  0 21:08 ?        00:00:00 asm_ckpt_+ASM
grid      1816     1  0 21:08 ?        00:00:00 asm_smon_+ASM
grid      1818     1  0 21:08 ?        00:00:00 asm_lreg_+ASM
grid      1820     1  0 21:08 ?        00:00:00 asm_pxmn_+ASM
grid      1822     1  0 21:08 ?        00:00:00 asm_rbal_+ASM
grid      1824     1  0 21:08 ?        00:00:00 asm_gmon_+ASM
grid      1826     1  0 21:08 ?        00:00:00 asm_mmon_+ASM
grid      1828     1  0 21:08 ?        00:00:00 asm_mmnl_+ASM
grid      1866     1  0 21:08 ?        00:00:00 oracle+ASM (DESCRIPTION=(LOCAL=YES)(ADDRESS=(PROTOCOL=beq)))
grid      1976  1580  0 21:09 pts/0    00:00:00 ps -ef
grid      1977  1580  0 21:09 pts/0    00:00:00 grep grid
With Oracle Grid Infrastructure you’ve got Oracle Restart – this way you can leave restart duty in this tool hands – when we create database it will be registered automatically within Oracle Restart. If you choose to do not use dbca to create database and do it manually then you need to remember to use srvctl to register database if you want to use Oracle Restart for a restart purposes after normal OS shutdown.
Database Software installation
I’m going to start OUI to install Oracle Database Software and then, separately, dbca to create database.
Start oracle user session, unpack media and start installation.
cd /media/sf_oracle/database/linux_x64_12.1.0.2.0/
unzip p17694377_121020_Linux-x86-64_1of8.zip -d /u01/app/stage/
unzip p17694377_121020_Linux-x86-64_2of8.zip -d /u01/app/stage/
cd /u01/app/stage/database/
./runInstaller
Below are the screens from installation.
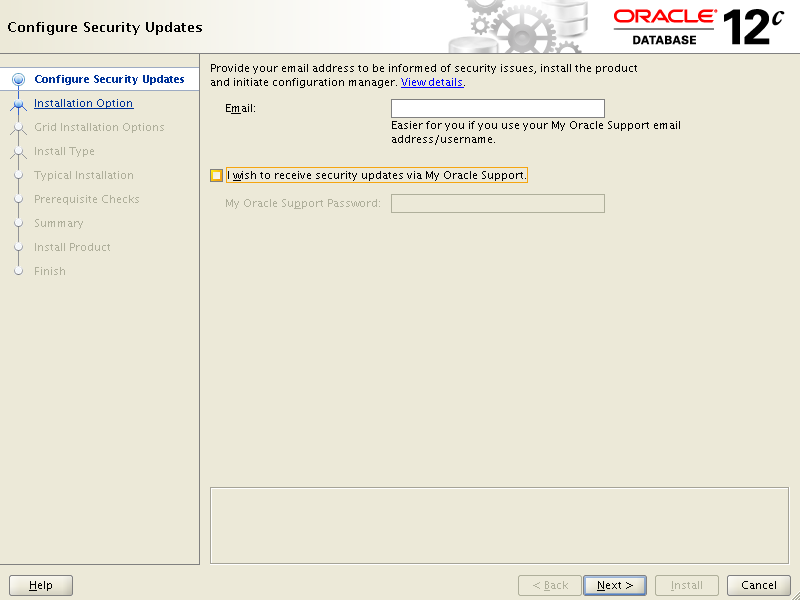
First page were you can deliver your email and register in My Oracle Support. We can skip this step.
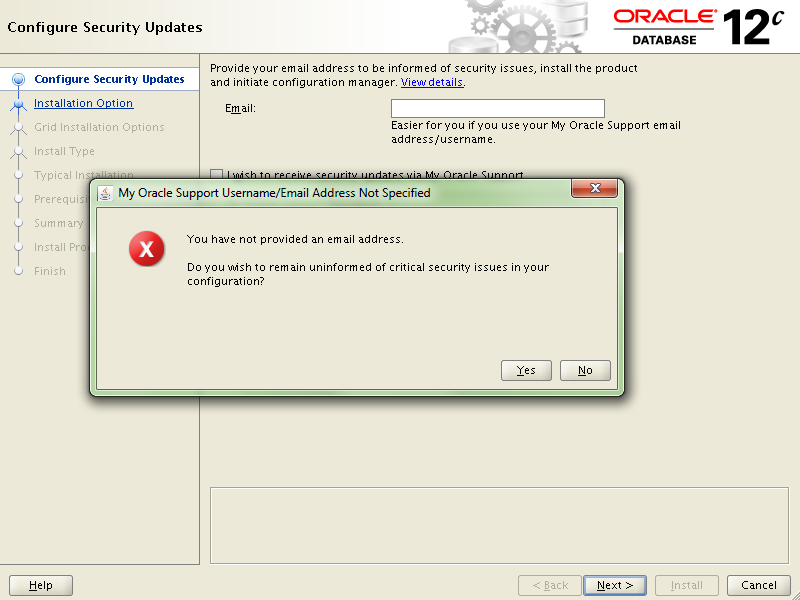
Oracle is very concerned about our security. We can hit Yes and go ahead with installation.
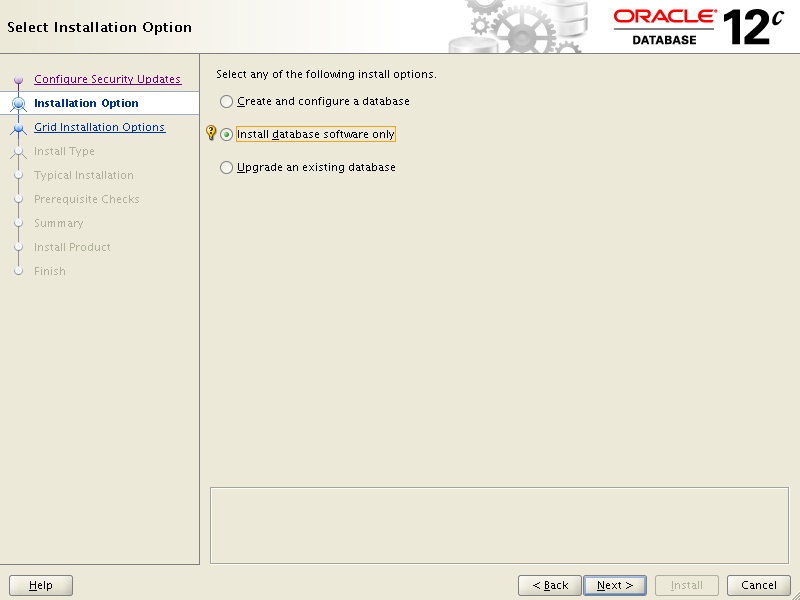
Choose to install software only – we will finish this installation with dbca tool anyway.
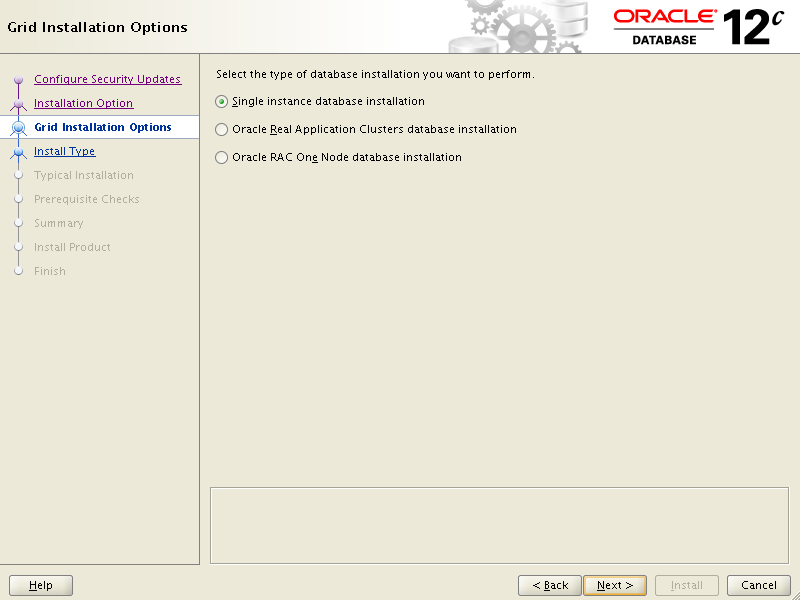
Single instance database installation is right choice for first and test installations.
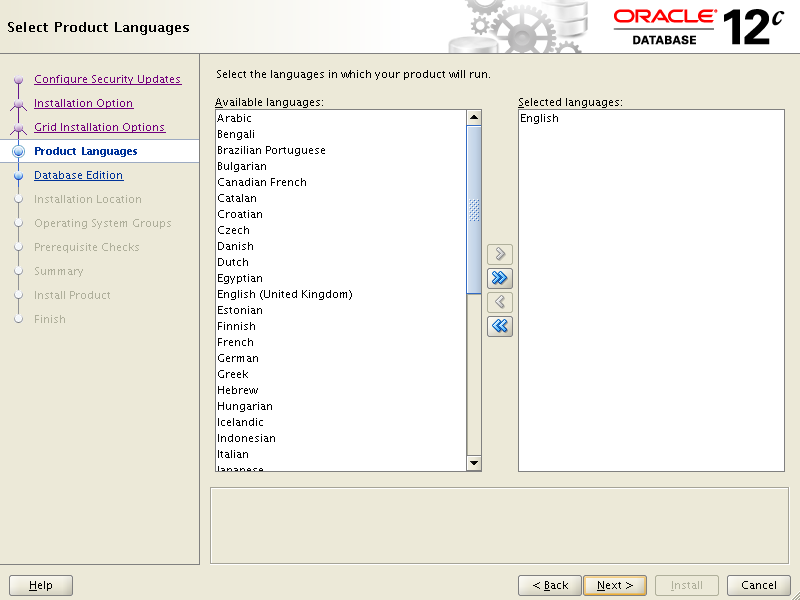
As usually – English should be sufficient in most cases.
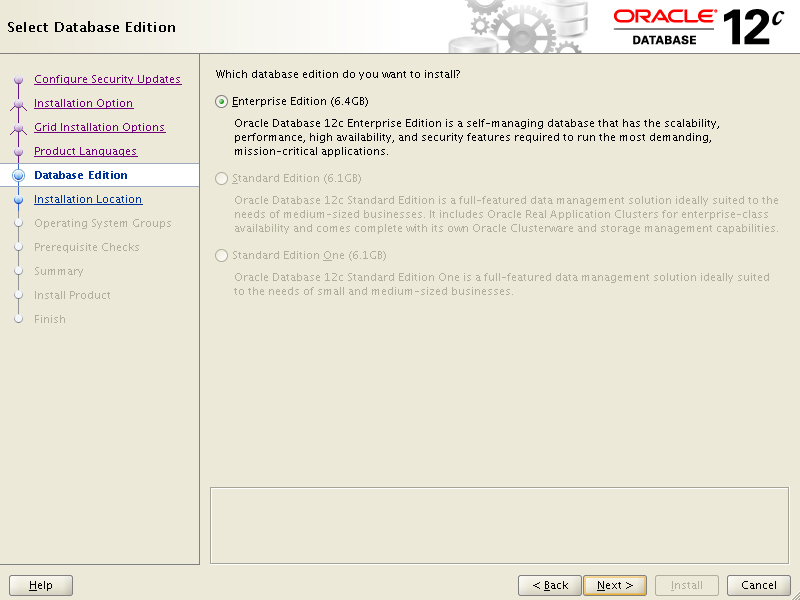
We can choose from: Enterprise Edition and Enterprise Edition. Choose carefully.
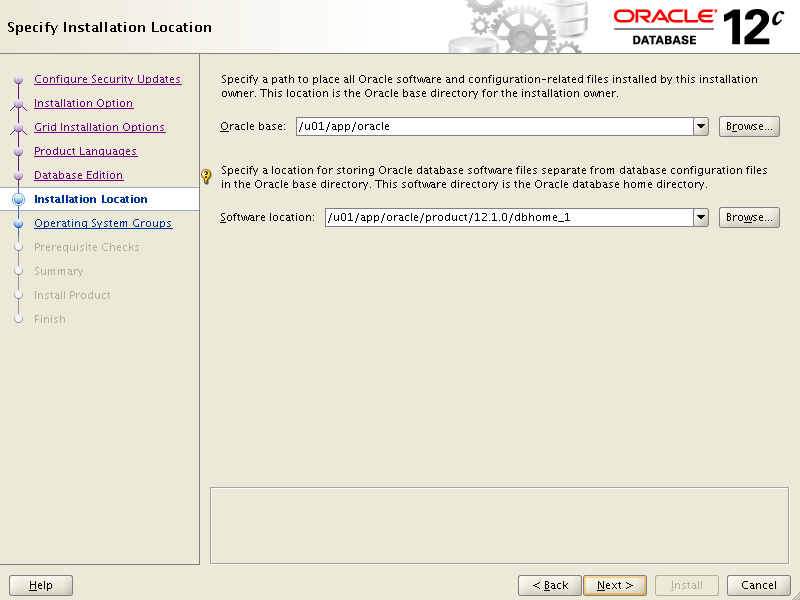
Our Oracle Home for database software – we can use /u01/app/oracle directory as prepared earlier for base and subdirectory /product/12.1.0/dbhome_1 as an Oracle Home.
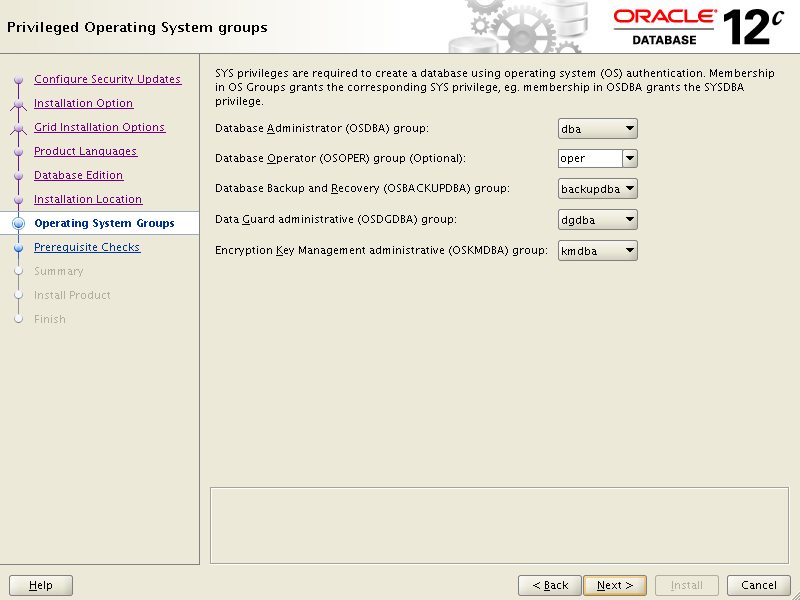
Here we have one of the new things – three new operating system privileges – for backup and recovery, data guard administration and encryption key management. We will use it later so it’s good to have this configured.
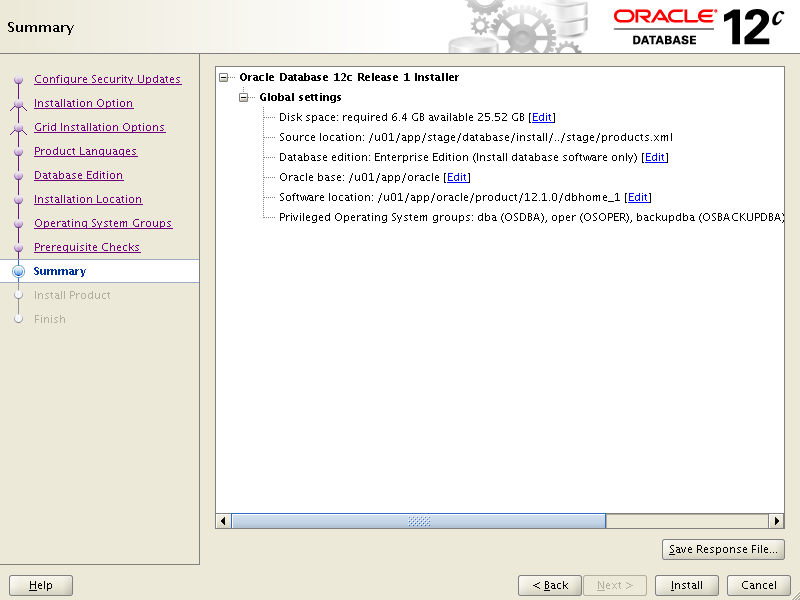
Prerequisite checks are fulfilled after Grid Infrastructure installation and we did everything Oracle ask us to do – as a result we didn’t have to do anything more. Here we have summary screen and we can hit install button to start the installation.
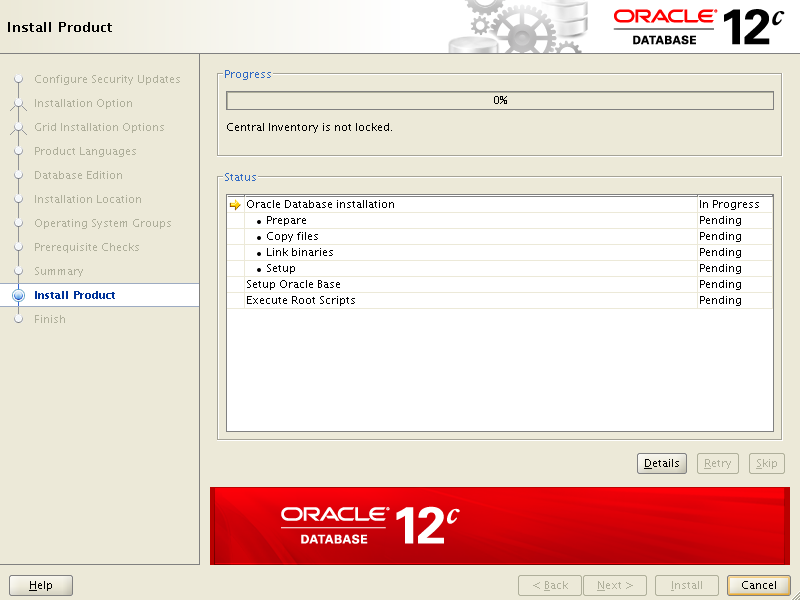
Standard progress bar – 0% and counting… for more 🙂
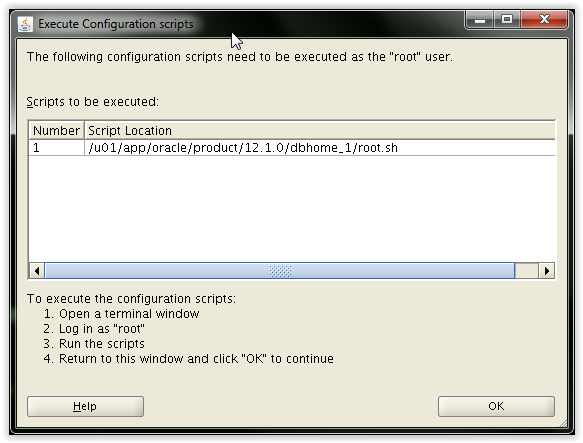
During the installation you will be asked to execute root script. User your root account to execute it:
/u01/app/oracle/product/12.1.0/dbhome_1/root.sh
All is done. We can proceed with Database Configuration Assistant (dbca) tool.
Create container database in dbca
When you’ll return to your oracle account putty session then you can set Oracle Home and PATH variable to be able to start dbca tool. Put those commands in your prompt and start dbca.
export ORACLE_BASE=/u01/app/oracle
export ORACLE_HOME=/u01/app/oracle/product/12.1.0/dbhome_1
export PATH=$ORACLE_HOME/bin:$PATH
dbca
After this command you should see dbca tool. Proceed with next steps presented on images below.
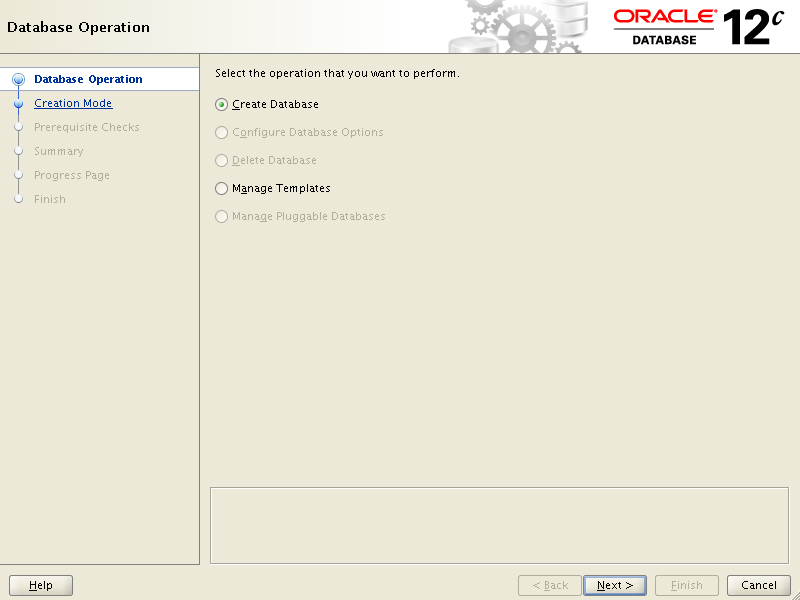
Starting screen – choose create database radio button and hit next button.

Change option to Advanced Mode.
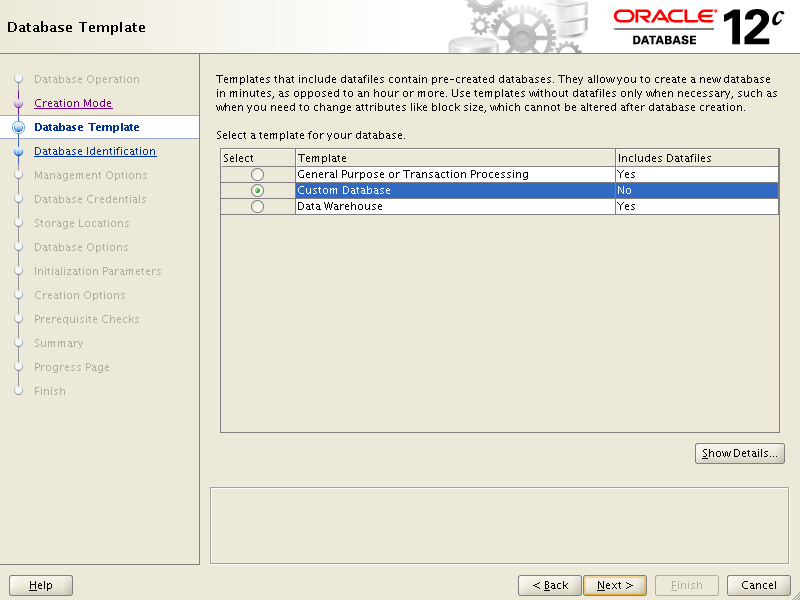
We would like to change our database – database files included in two templates decrease database creation time but you don’t have much influence on database parameters. We would like to customize couple things.
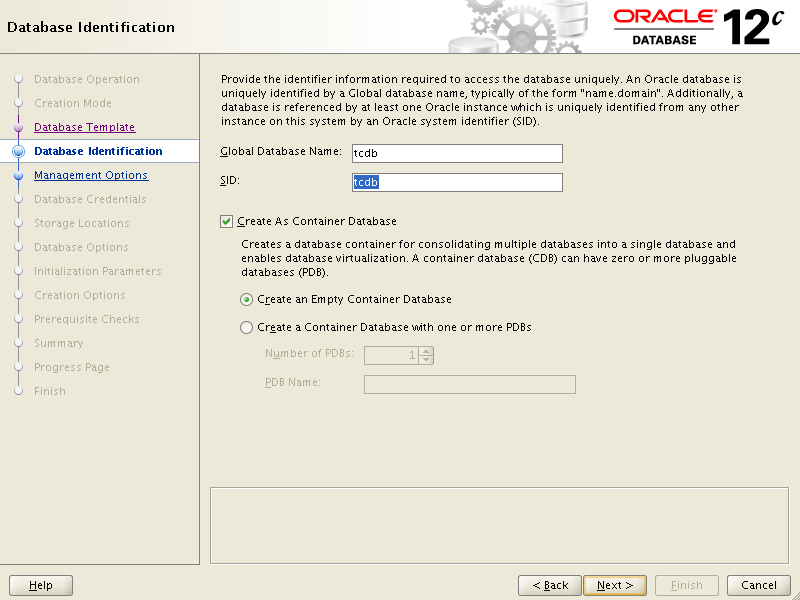
Set database name as short as possible – try to do not exceed 8 characters. For me tcdb is good enough. Change radio button to create empty container database.
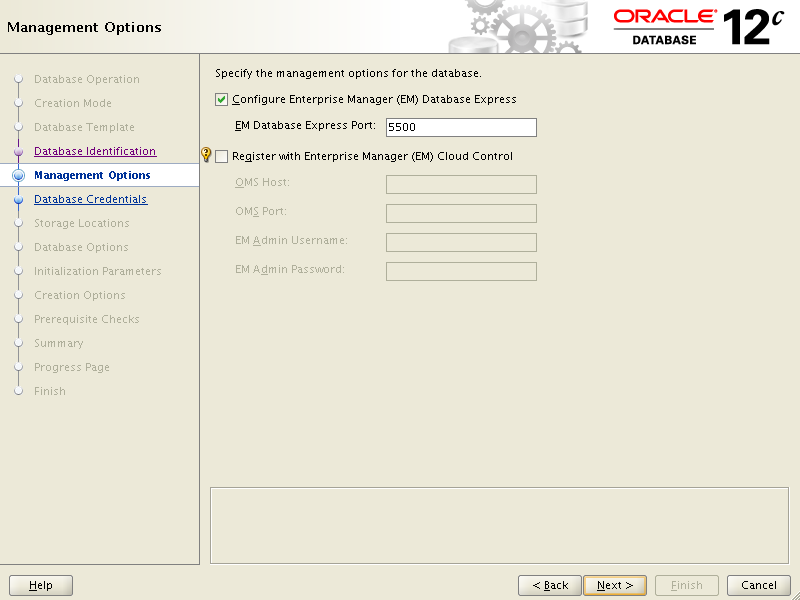
Configure Database Express for nice graphs about simple database metrics like… hm… you’ll see – this version of Enterprise Manager is really basic and by basic I mean: you can do almost nothing in it.
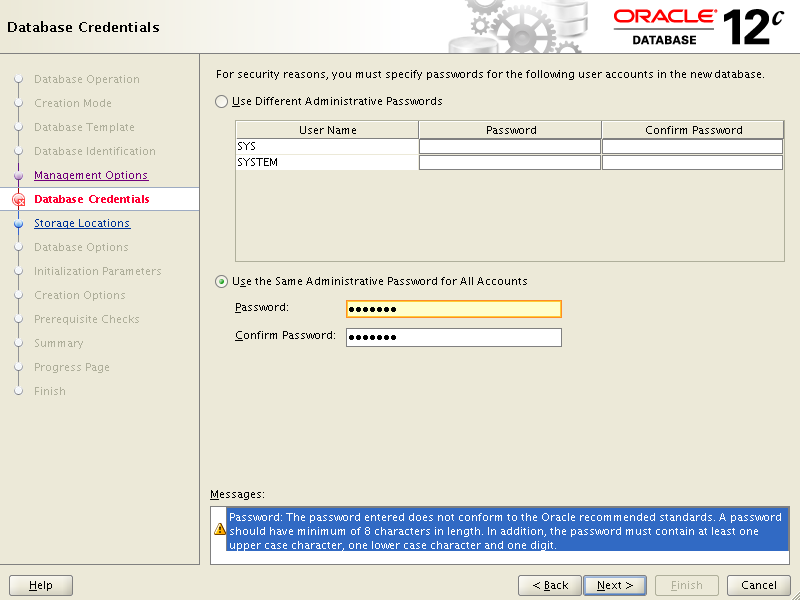
Set passwords.
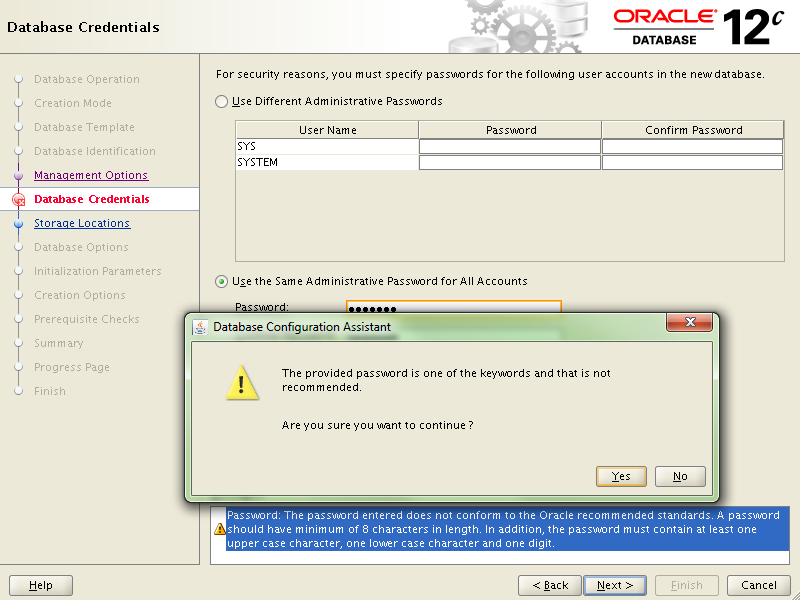
Again, agree, that this is really easy to guess password and face the truth by pressing Yes button.
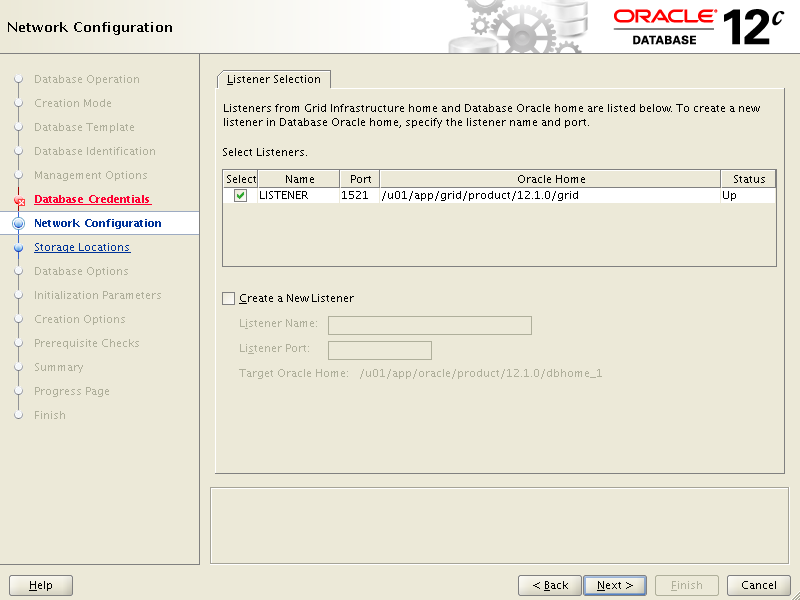
We will use grid listener. There is no need to multiply testing entities.
We wont use ASM instance yet – you can test it later by, for example, migrating your database to ASM with really nicely written procedure in Oracle Documentation – choose manual option – it works better than Cloud Control version.
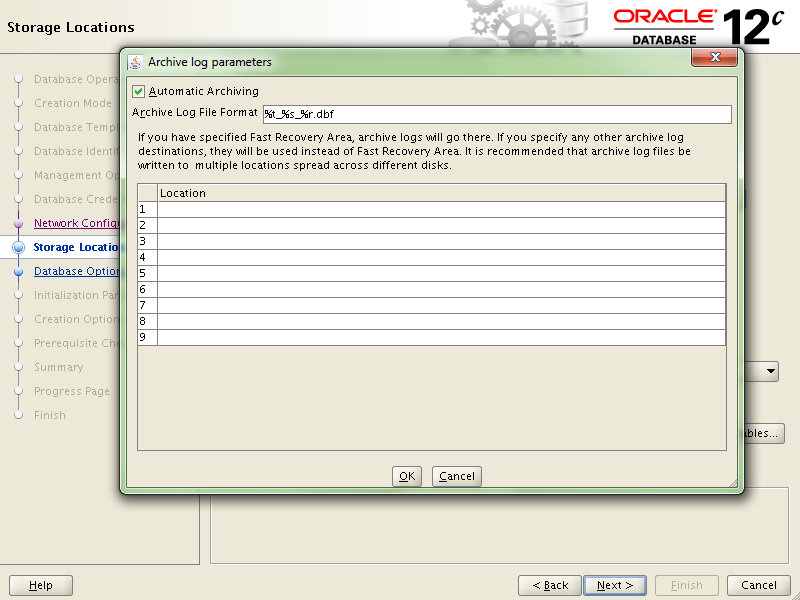
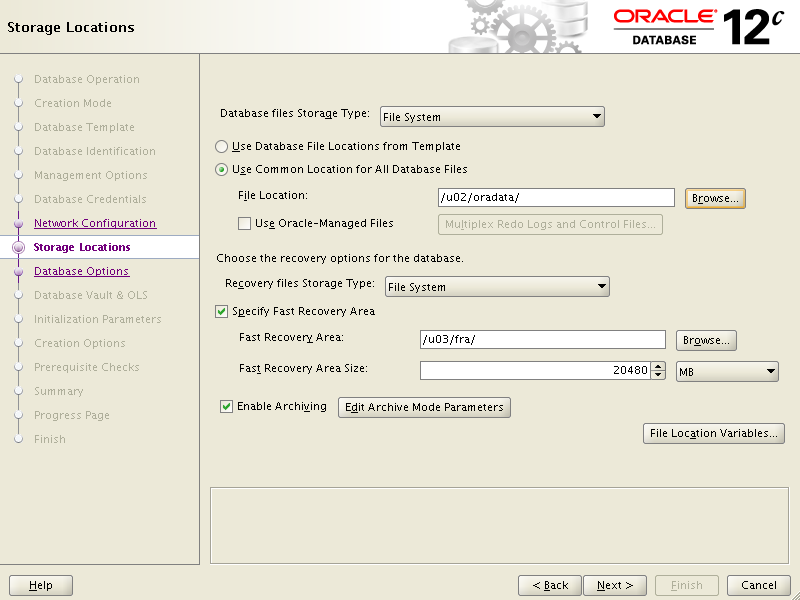
Under archive log parameters leave the defaults – this way your database will save archivelogs in fra space.
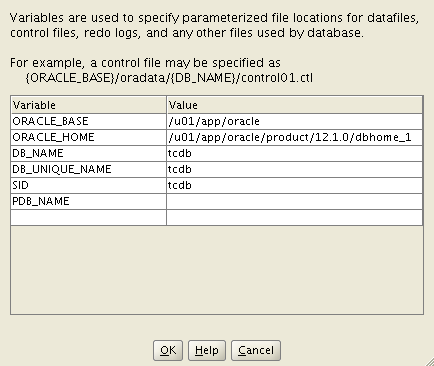
Those are variables which you can use in paths – this way it’s easier to create own template for future reuse.
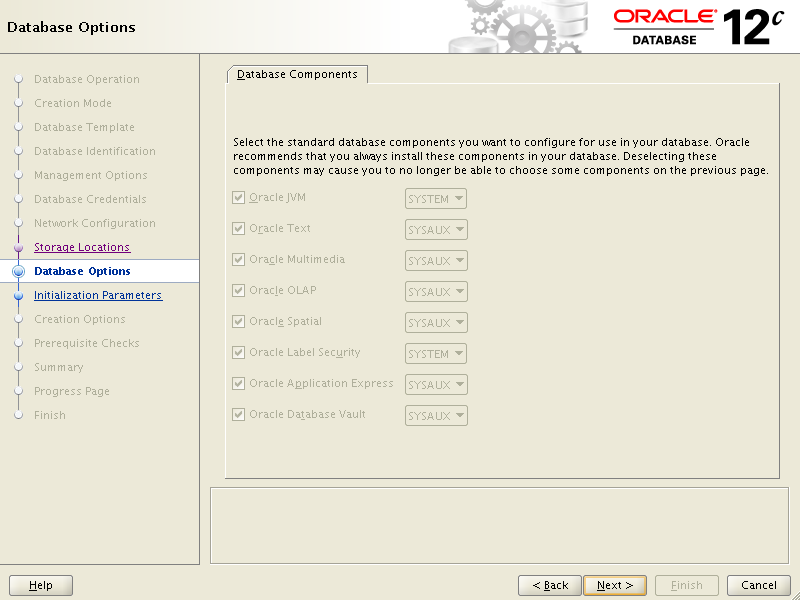
There is no direct explanation why we need to install all options for container database – looks like this is a security option to do not plug PDB or convert non-CDB database with option which aren’t available in a system library. We need all options for all possible database options scenarios.
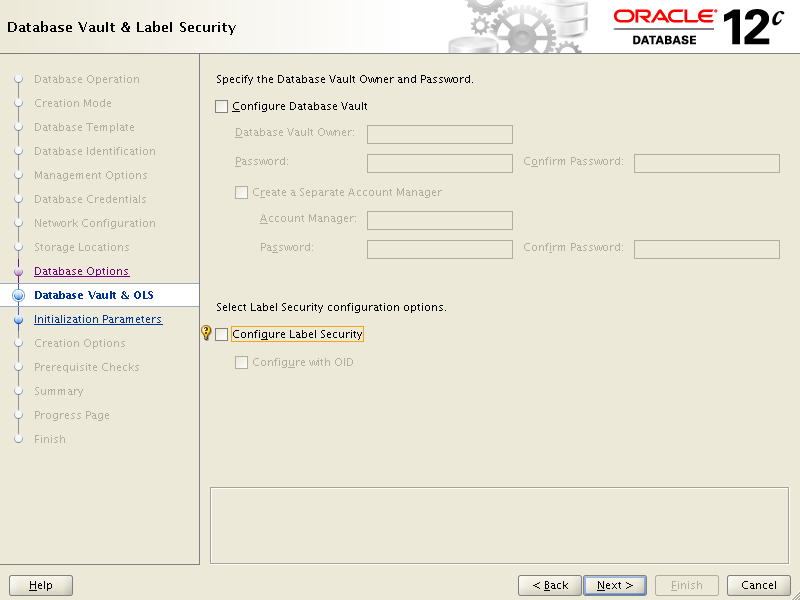
We don’t need any of those options.
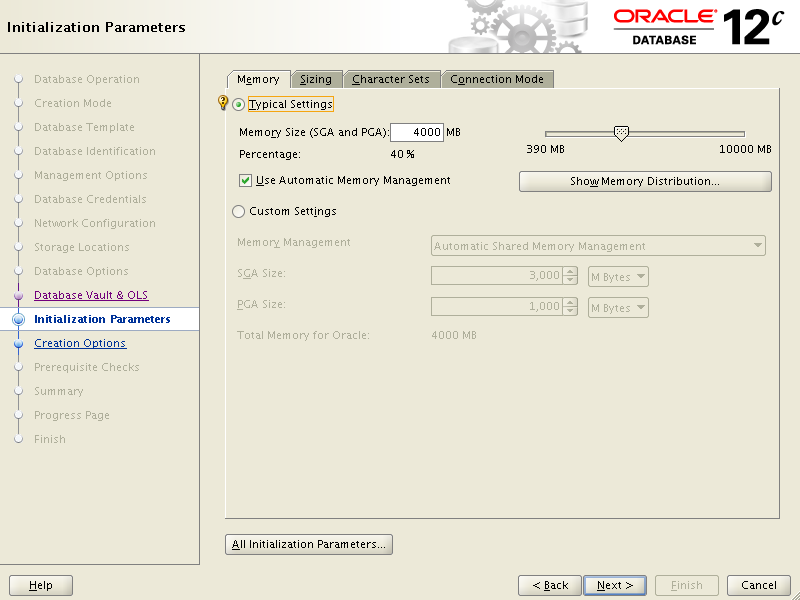
Fast walk over database parameters. For Memory size do not use less than ~1280M – it’s a really good idea to have this value on adequately high level to let Oracle create dictionary in peace. Check to use Automatic Memory Management.
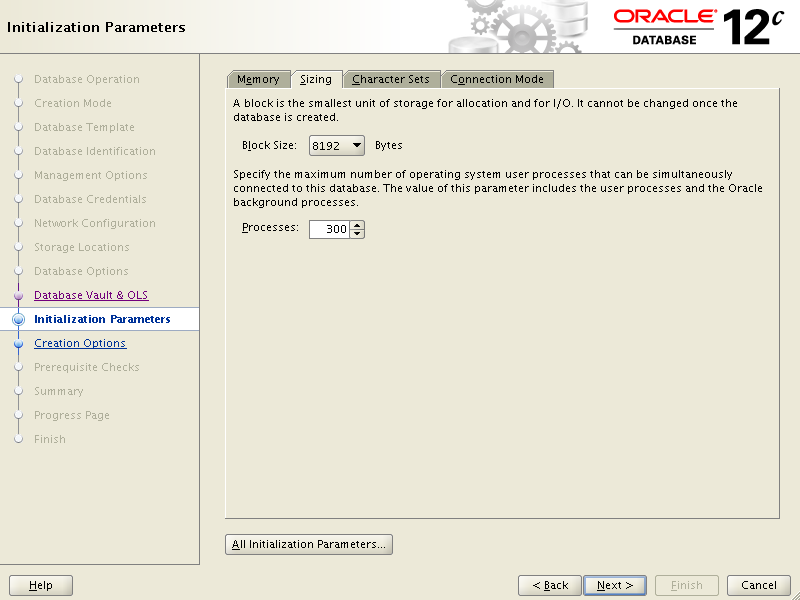
Block size and processes as a defaults.
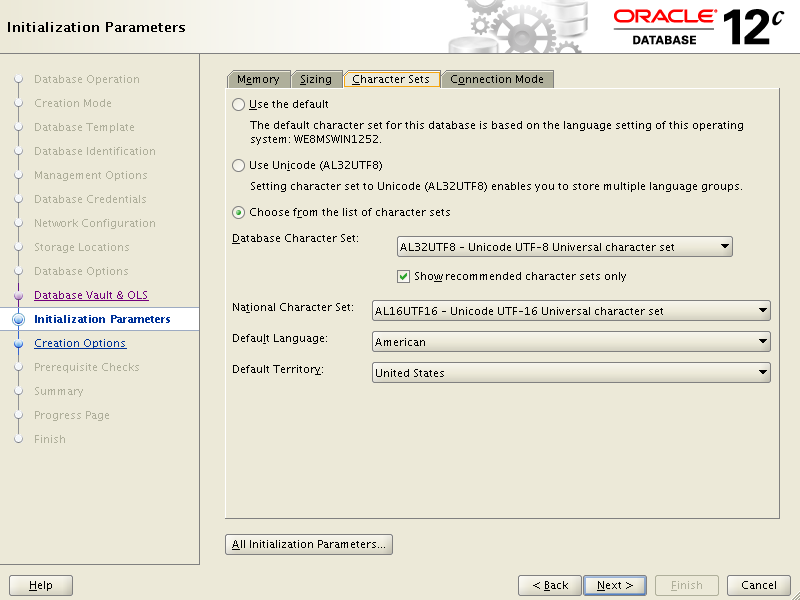
Change character sets to al32utf8 and national to al16utf16.
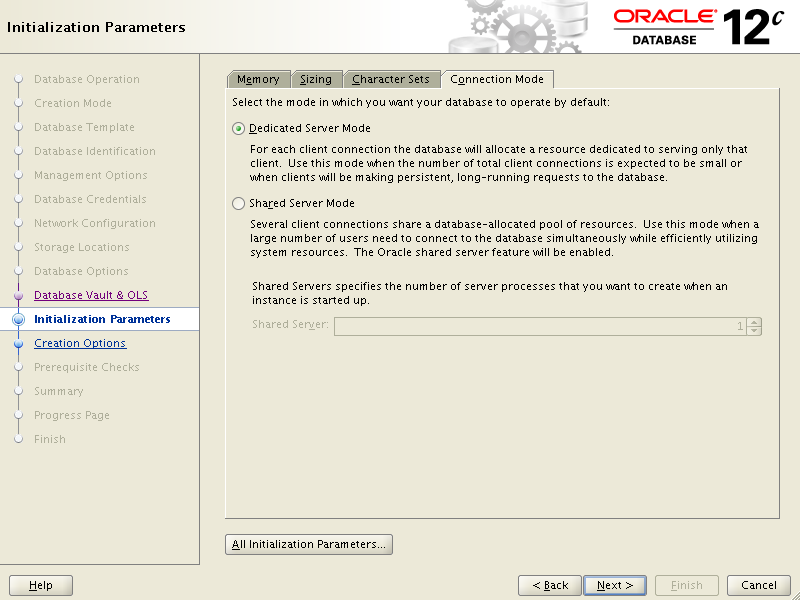
Dedicated server will be great for us. We can configure shared servers later. Hit next button.
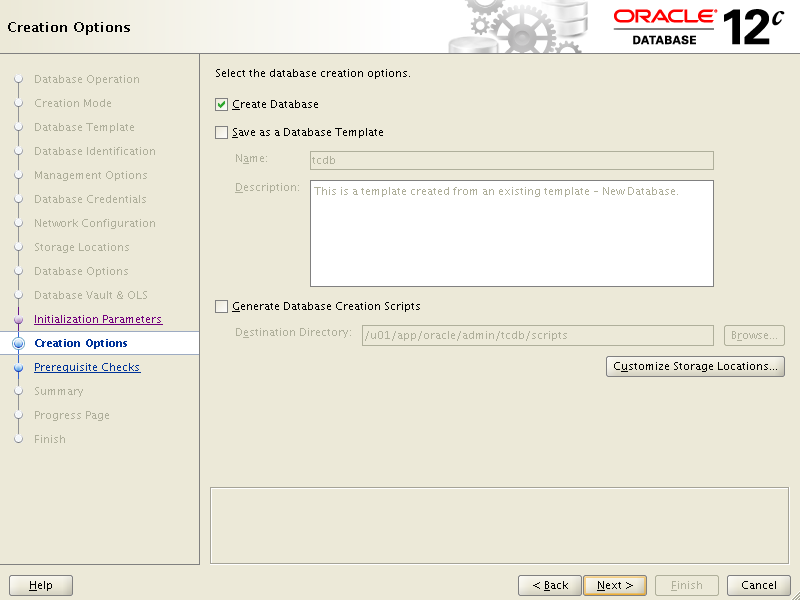
Create database – this is the only one checker needed here. You can generate scripts for later use of manual database creation. Under Customize storage locations you can find much more than just locations there is a whole new menu for redo log groups and database files parametrization. Right now we don’t need to adjust anything and leave all as defaults.
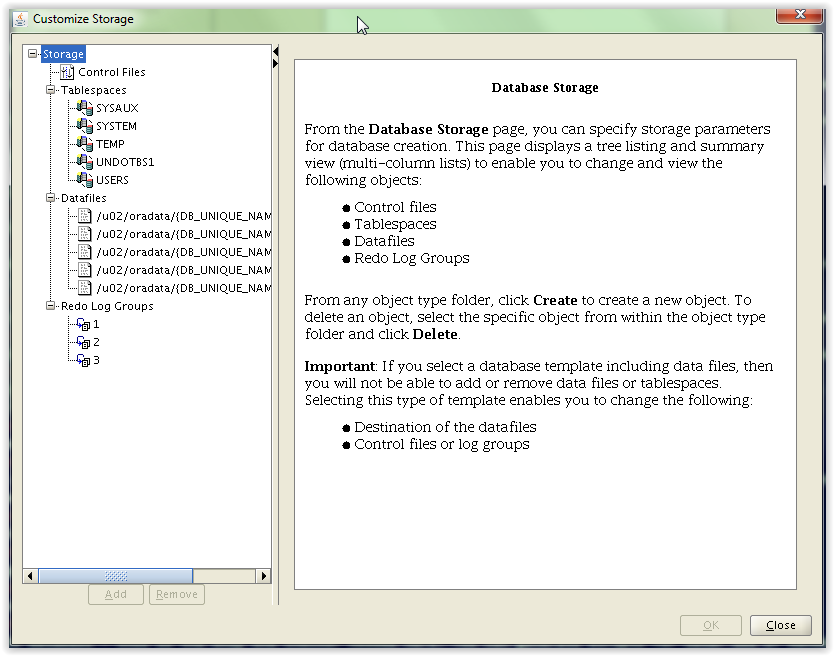
New menu which is hidden under Customize storage button – just to show you, that we can use GUI to set those options too – for this installation we don’t need to adjust anything here. Leave this window using Close button and continue with database creation procedure.
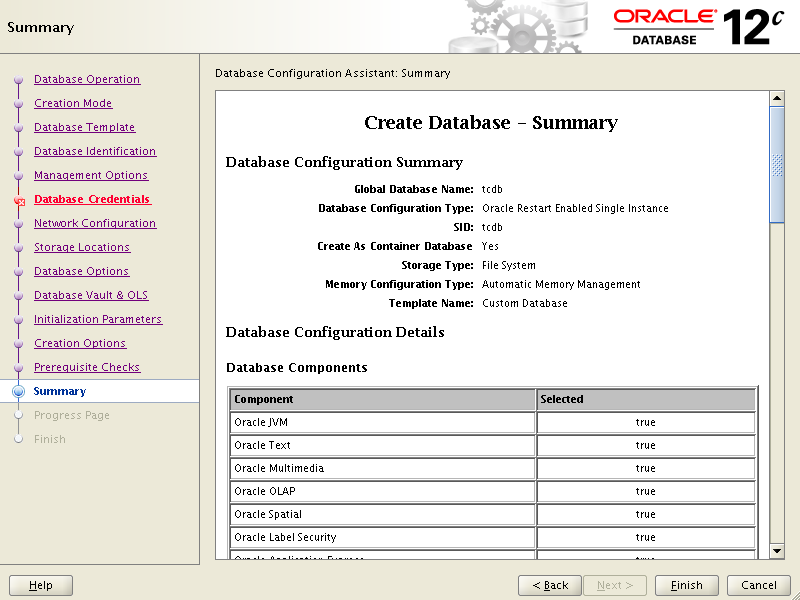
Summary screen – html formatted report with details about your database. Hit finish button to start database creation.
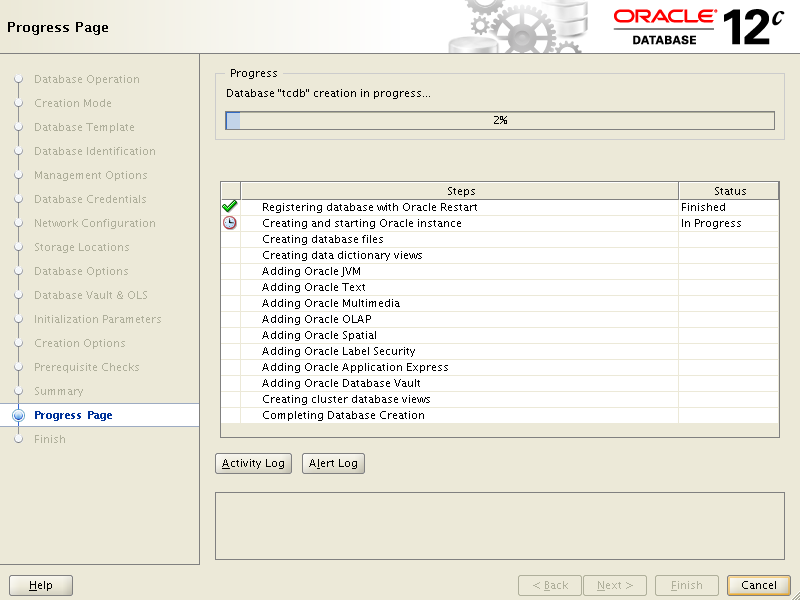
On my host this process took more than 2 hours. When I was installing for the first time version 12.1.0.1.0 it took 4,5 hours. After patchset 12.1.0.1.2 I could manually create container database (Oracle forgot about one script which was documented but not present in a script directory…) and it took around 4 hours. It looks like we’ve got some progress.
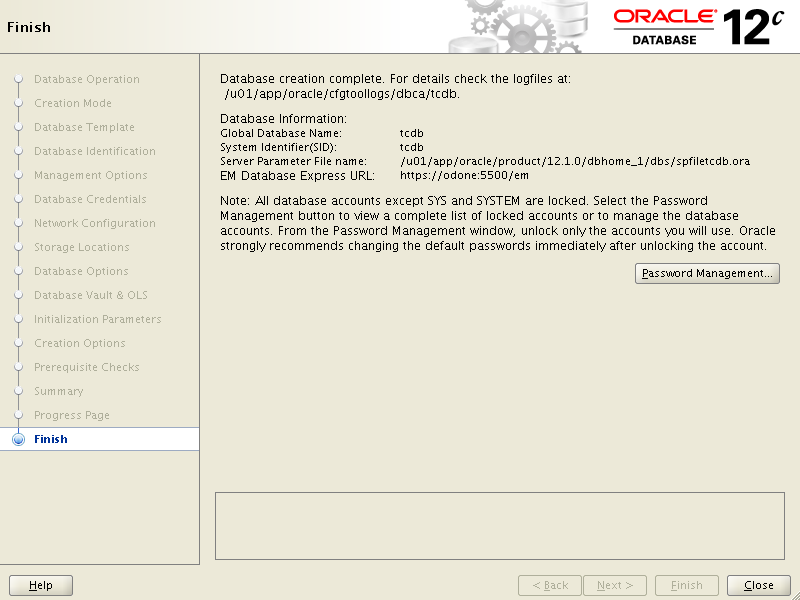
Last screen with information about our database name, EM Database Express default port and spfile location. Hit Close button to leave dbca. You can check database processes with ps command and grep by oracle.
Best Regards
Patrycjusz
I would like to thank Sławomir Wasiołek for his positive feedback, constructive notes and tests of this guide. Thank you Sławek!
Really good and detailed article. Thanks for sharing Patrycjusz.
Great tutorial!
Thx.